Cauliflower is such a versatile vegetable, and it takes on the texture of ground meat in this easy taco filling. Chipotle adds a hint of smoky spice that makes it seem meaty, and the black beans lend a creamy, hearty texture.
Active time: 15 minutes | Total time: 20 minutes
Cauliflower Black Bean Tacos
Ingredients
6 corn tortillas
4 cups (400g) cauliflower florets
1 tsp olive oil
2 cloves garlic, chopped
1 tsp chipotle powder
1/4 tsp salt
1 (15 oz.) can no-salt black beans, rinsed and drained
1
Cauliflower is such a versatile vegetable, and it takes on the texture of ground meat in this easy taco filling. Chipotle adds a hint of smoky spice that makes it seem meaty, and the black beans lend a creamy, hearty texture.
Active time: 15 minutes | Total time: 20 minutes
Cauliflower Black Bean Tacos
Ingredients
6 corn tortillas
4 cups (400g) cauliflower florets
1 tsp olive oil
2 cloves garlic, chopped
1 tsp chipotle powder
1/4 tsp salt
1 (15 oz.) can no-salt black beans, rinsed and drained
1/4 cup (40g) green onions, chopped
2 large tomatoes, chopped
1/4 cup (15g) cilantro, coarsely chopped
Directions
Preheat the oven to 400ºF (200ºC), and wrap the tortillas in foil. Heat the tortillas for 10 min.
Place the cauliflower in a food processor and pulse until chopped to the size of ground beef.
Coat a large saute pan with olive oil and place over medium-high heat; add the cauliflower. Cook, stirring frequently for about 5 min., until the cauliflower is tender and the pan is dry. Add the garlic, chipotle powder, salt and black beans and cook until hot.
Serve 1/2 cup of the cauliflower filling in each corn tortilla, top with green onions, tomatoes and cilantro.
Plant-based proteins make for a simple but hearty meal loaded with fiber and heart-healthy polyunsaturated fats (1). Sweet potatoes serve as a comforting base for this flavor-packed bowl, laced with rosemary and tangy balsamic vinegar. Roasting chickpeas makes them crunchy and irresistible — the perfect topper for a colorful bowl of goodness.
Active time: 20 minutes | Total time: 35 minutes
Sweet Potato and Roasted Chickpea Bowl
Ingredients
1 15-oz. can low sodium chickpeas, drained and rinsed
3 tbsp olive oil, divided
1 tbsp fresh rosemary, chopped, divided
2 tbsp balsamic vinegar
1 clove garlic, pressed
1/2 tsp salt
4 cups cubed sweet potato, from about 2 medium potatoes
4 cups chopped kale
1/4 cup toasted walnuts, coarsely chopped
Directions
Preheat the oven to 400°F (205°C). Place the drained chickpeas on a kitchen towel and fold the towel over to enclose them. Rub gently to loosen the skins, then discard the skins. Transfer the chickpeas to a sheet pan.
Drizzle 1 tbsp olive oil over the chickpeas, add 2 tsp of the chopped rosemary, and toss to coat. Roast for 25–30 minutes, or until the chickpeas are crisp. Remove from the oven and let cool slightly.
In a small bowl, whisk together the remaining olive oil, balsamic vinegar, remaining 1 tsp rosemary, garlic, and salt to make the dressing.
Cube the sweet potatoes and place them in a steamer basket set over simmering water. Steam for about 5 minutes, or until tender when pierced with a paring knife.
Meanwhile, place the chopped kale in a large bowl and pour the dressing over it. Massage the kale with your hands for about 1–2 minutes, until slightly softened and well coated. Divide the dressed kale evenly among 4 bowls, then top each bowl with sweet potatoes.
Top each bowl with one-quarter of the roasted chickpeas and sprinkle with the chopped walnuts. Serve immediately.
Serves: 4 | Serving Size: About 2 1/2 cups per serving
This salad is vegan and incredibly satisfying — a big bowl of lettuce and radicchio smothered with a creamy, herby green goddess dressing made from avocado. Slices of roasted beets, cucumber and cherry tomatoes make it deliciously easy to devour your vegetables. The sunflower seeds up the protein to 7 grams per serving — and add a lovely crunch. Boost the protein even more with some edamame to make this a complete meal.
Active Time: 10 minutes | Total time: 10 minutes
Vegan Green Goddess Salad
I
This salad is vegan and incredibly satisfying — a big bowl of lettuce and radicchio smothered with a creamy, herby green goddess dressing made from avocado. Slices of roasted beets, cucumber and cherry tomatoes make it deliciously easy to devour your vegetables. The sunflower seeds up the protein to 7 grams per serving — and add a lovely crunch. Boost the protein even more with some edamame to make this a complete meal.
Active Time: 10 minutes | Total time: 10 minutes
Vegan Green Goddess Salad
Ingredients
1 medium avocado, pit and peel discarded
1/2 cup mixed tender herbs such as basil, chives, dill or tarragon, chopped
1/4 cup (60g) lemon juice
1 tbsp maple syrup
1 tbsp olive oil
1 tbsp tahini
1 small garlic clove, peeled
1/4 tsp salt
1/4 tsp black pepper
1/4 cup water
1 7 oz (198g) bag mixed baby greens with radicchio
1 cup (85g) cherry tomatoes, halved
1 cup (170g) store-bought roasted beets, peeled and sliced
1/2 cucumber, halved lengthwise and thinly sliced
1/2 cup (57g) toasted sunflower seeds
Directions
Combine the avocado flesh, herbs, lemon juice, maple syrup, olive oil, tahini, garlic, salt and pepper in a blender. Add 1/4 cup water and blend until smooth.
For the salad, toss the greens and 1/2 cup of the dressing together and mound the salad on four plates. Arrange the cherry tomatoes, beets and cucumbers on top. Dot each salad with the remaining dressing, if desired. Sprinkle with the sunflower seeds and serve.
Serves: 4 | Serving Size: About 2 cups salad, 1/4 cup dressing
This collection of 26 Healthy Patties, Fritters and Protein Balls brings together some of my favorite easy recipes that are simple to make, satisfying, and perfect for everyday meals.
Inside, you’ll find a delicious mix of vegetable fritters, protein-packed balls, cheesy bites, potato pancakes, baked kofta, and crispy patties made with wholesome ingredients. Some recipes are light and fresh, while others are cozy and comforting, but all of them are made with real ingredients and simple method
This collection of 26 Healthy Patties, Fritters and Protein Balls brings together some of my favorite easy recipes that are simple to make, satisfying, and perfect for everyday meals.
Inside, you’ll find a delicious mix of vegetable fritters,protein-packed balls, cheesy bites, potato pancakes, baked kofta, and crispy patties made with wholesome ingredients. Some recipes are light and fresh, while others are cozy and comforting, but all of them are made with real ingredients and simple methods you can easily recreate at home.
What I love most about these recipes is how versatile they are. They work for quick lunches, easy dinners, meal prep, snacks, or even party platters. Many are family-friendly and a great way to use vegetables, beans, potatoes, cheese, or leftover ingredients in a creative and tasty way.
You can bake them, pan-fry them, or air-fry them, these savory bites are the kind of recipes you’ll want to make again and again. Simple, flavorful, crispy, and comforting, this is the kind of everyday food that always disappears fast at the table.
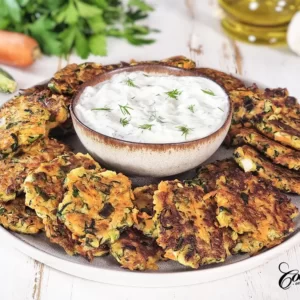
These incredible Zucchini Carrot Fritters are easy, tasty and nutritious crispy, golden bites that bring the freshness of zucchinis and the zing of carrots to your plate, all in one simple dish.
These Salmon Patties are an amazing dish that's both simple and bursting with flavor. They are quick and easy to prepare, with a crispy golden crust and a tender center. They make a great appetizer with your favorite dipping sauce or a satisfying main course for lunch or dinner, complemented by your favorite side dish.
Fresh, earthy zucchini meets the salty tang of feta in these irresistible Greek Zucchini Feta Balls, known as Kolokithokeftedes. They’re a summertime favorite all over Greece – crispy on the outside, soft and creamy inside, speckled with fresh dill and mint, and absolutely bursting with Mediterranean flavor.
These Veggie Burgers with Sweet Potato Burger Patties make a great lunch or dinner idea. It is so delightful, that even meat lovers will consider switching the beef burgers for these veggie ones, at least from time to time.
These Chickpea Patties are the kind of meal I love making on busy days when I want something homemade, nourishing, and full of flavor without too much effort. They use simple ingredients, but together they create patties that are crisp on the outside, soft in the middle, and incredibly satisfying.
These Four Cheese Crispy Cheese Balls are an easy appetizer idea, perfectly blending the irresistible flavors of Feta, Gouda, Cheddar, and Parmesan into golden, crispy perfection. They make for an excellent addition to your holiday table.
If you're looking for a simple, nourishing recipe that's full of flavor, these Lentil Fritters are just the thing. They're made with tender lentils, sweet carrots, fresh parsley, and just the right amount of onion and garlic to make them wonderfully savory. Eggs and breadcrumbs help bring everything together into crisp, golden patties that are satisfying without feeling heavy.
These broccoli and cheese balls are really easy to prepare, and you can serve as they are with a dipping sauce, or use them in tortilla wraps, as a side dish or a great snack on the go. They also can be made as an healthy appetizer for parties and family gatherings. They keep well refrigerated for several days or frozen for later use.
Crispy on the outside and soft and cheesy on the inside, these baked Crispy Cottage Cheese Balls are one of those recipes that disappear faster than you expect. They’re simple, comforting, and exactly the kind of food I enjoy making when I want something homemade and satisfying.
Zucchini fritters taste very good, the parsley and dill bring such a nice summery flavor. They are best served warm alongside some garlic sour cream and can make a great lunch or appetizer.
These homemade meatballs are prepared with a delightful blend of ground beef, pork, and a surprising twist – grated potato. These mouthwatering meatballs offer a unique combination of flavors and textures that will leave you craving for more.
Corn Fritters are an amazing dish you can prepare for breakfast, lunch or dinner or even as an appetizer. Making these delicious fritters with fresh corn it is a must during the summer, you definitely won’t regret. Grilled fresh corn takes these fritters to a whole new level. The best part of these delicious fritters is that they can be made all year round as canned or frozen corn may be used instead of the fresh one.
These flavorful Korean Vegetable Pancakes called Yachaejeon are one of the best vegetable dishes you can ever prepare. The pancakes are cooked until crispy and golden brown and are best served with a spicy soy dipping sauce. They make a delicious and comforting side dish and a family favorite for sure.
These Ricotta Fritters are one of the best ways to cook ricotta whenever you are in a hurry and still want to have a delicious breakfast, lunch, or dinner.
These potato cheese balls are crispy, with gooey melted cheese in the middle, easy to prepare, healthy and really addictive. They can be also be made from leftover mashed potatoes but I preferred boiling the potatoes with their skin-on for this recipe only. This is a step you can do ahead of time, even a day in advance. Peel only before going further with the recipe.
These Baked Arancini are my take on a classic Italian favorite, made just a bit lighter, but just as comforting. Instead of deep frying, these are baked until beautifully golden, which means less mess and a little more balance without giving up that satisfying crunch.
This Oven-Baked Kofta is one of those recipes that makes dinner feel special without any fuss. This version uses a mix of lean ground beef and pork for maximum flavor and juiciness, paired with simple spices like cumin, coriander, paprika, and a touch of garlic. The result is warm, aromatic, and deeply satisfying.
Leftover turkey meatballs – a great way to use leftover turkey. Flavorful, crispy exterior and soft inside. You can hardly say these are made from leftover meat.
Delicious, healthy vegetable balls. A good way to have children eat vegetables. Great as appetizer or used on a main dish plate with rice, pasta or potatoes.
Spiced just right for fall, this flavorful chicken and butternut squash stew is delicious served over whole wheat couscous. To save time, look for cubed winter squash in the produce department—you can also substitute with sweet potatoes.
Active time: 20 minutes | Total time: 30 minutes
One-Pot Chicken & Butternut Squash Stew
Ingredients
2 tsp olive oil
1 lb boneless, skinless chicken breasts, cut into 1” pieces
1 medium (110g) onion, chopped
2 tsp ras el hanout spice blend*
1/2 tsp salt, di
Spiced just right for fall, this flavorful chicken and butternut squash stew is delicious served over whole wheat couscous. To save time, look for cubed winter squash in the produce department—you can also substitute with sweet potatoes.
Active time: 20 minutes | Total time: 30 minutes
One-Pot Chicken & Butternut Squash Stew
Ingredients
2 tsp olive oil
1 lb boneless, skinless chicken breasts, cut into 1” pieces
1 medium (110g) onion, chopped
2 tsp ras el hanout spice blend*
1/2 tsp salt, divided
3 cups low-sodium chicken broth, divided
4 cups (560g) butternut squash, diced into 1” cubes
1 14.5-oz. can fire-roasted diced tomatoes, undrained
2 tbsp chopped fresh cilantro
1 1/2 cups (260g) whole-wheat couscous
Directions
Heat the olive oil in a large nonstick skillet over medium-high heat. Add the chicken and onion and cook for about 3 minutes, stirring frequently, until the chicken is lightly browned and the onion is translucent.
Stir in the ras el hanout spice blend and 1/4 tsp salt and cook for 1 minute. Add 1 cup chicken broth, the butternut squash, and tomatoes. Bring to a boil, then reduce the heat, cover, and simmer for about 20 minutes, or until the chicken is cooked through to an internal temperature of 165°F and the squash is tender. Stir in the cilantro.
Meanwhile, bring the remaining 2 cups chicken broth to a boil in a saucepan over medium-high heat. Whisk in the couscous and remaining 1/4 tsp salt. Remove from the heat, cover, and let stand for 5 minutes. Fluff with a fork.
Spoon the couscous into a serving bowl or onto individual plates. Top evenly with the chicken and squash mixture and drizzle with the pan juices.
*Ras el Hanout is a seasoning blend with a very lengthy list of spices used in Moroccan and North African cuisine. For this recipe, you can substitute 3/4 tsp ground cumin, 1/2 tsp ground ginger, 1/4 tsp paprika, 1/4 tsp ground coriander, 1/8 tsp ground cinnamon, a pinch of ground allspice, and a pinch of cloves.
Serves: 6 | Serving Size: 3/4 cup couscous + 1 cup chicken and squash mixture
This juicy, fall-off-the-bone healthy Instant Pot Greek chicken tastes like it has been roasting in the oven for hours when really it comes together in about an hour thanks to an electric pressure cooker. A delicious mix of fresh herbs, lemon zest and garlic is tucked into the skin to flavor the meat while the juices mingle with olives and capers to make a bright-tasting pan sauce.
Pro tip: A gravy separator is an inexpensive tool that makes skimming the fat off of soups and sauces like this one
This juicy, fall-off-the-bone healthy Instant Pot Greek chicken tastes like it has been roasting in the oven for hours when really it comes together in about an hour thanks to an electric pressure cooker. A delicious mix of fresh herbs, lemon zest and garlic is tucked into the skin to flavor the meat while the juices mingle with olives and capers to make a bright-tasting pan sauce.
Pro tip: A gravy separator is an inexpensive tool that makes skimming the fat off of soups and sauces like this one a snap.
To reduce the calories and saturated fat in this recipe, remove the skin before cooking. Serve with a high-fiber grain, like farro or quinoa, and a side of steamed veggies.
Active time: 20 minutes | Total time: 1 hour, 5 minutes
Pressure Cooker Greek Chicken
Ingredients
1 medium lemon
1 (6-inch/15cm) fresh rosemary sprig
1 (6-inch/15cm) fresh oregano sprig
2 medium garlic cloves
1 tsp black pepper
1/2 tsp salt
1 (4-lb/1.8kg) whole chicken, giblets and neck removed from cavity, if present
Cooking spray
1 tbsp olive oil
1/2 medium yellow onion, sliced
1/4 cup pitted Castelvetrano olives, smashed
1 tbsp vinegar-packed capers, rinsed and drained
Directions
Zest the lemon onto a cutting board. Cut the lemon in half and juice it into a measuring cup. Add enough water to make 1/2 cup (118ml) and set aside. Pull the rosemary and oregano leaves off the woody stems and discard the stems. Mound the herbs and garlic on top of the lemon zest and chop everything together until the mixture forms a coarse paste. Transfer the mixture to a small bowl, add the pepper and salt, and stir to combine.
Carefully slide your fingers under the skin of the chicken covering the breast, thighs, and drumsticks. Stuff the lemon zest-herb mixture under the chicken skin, spreading evenly. Tuck the wing tips under the chicken. Remove and discard the yellow fat inside the chicken cavity. Stuff the spent lemon halves into the cavity and tie the ends of the drumsticks together with kitchen string. Spray a trivet with handles with cooking spray and place the chicken breast-side up on the trivet. Set aside.
Put the olive oil in the Instant Pot and adjust to high heat. Add the onion and cook, stirring frequently, until tender and beginning to brown, about 4 minutes. Press Cancel. Add the lemon juice-water mixture and scrape up any browned bits from the bottom of the pot. Add the olives and capers and stir to combine. Place the chicken on the trivet in the pot. Lock the lid and make sure the pressure valve is sealed. Select Pressure Cook, adjust to high pressure, and cook for 24 minutes.
When the cooking program ends, allow the pressure to release naturally for 15 minutes. Release any remaining pressure. Wearing oven mitts, lift the chicken on the trivet out of the pot and place it on a rimmed baking sheet. Using an instant-read thermometer, check that the chicken has reached an internal temperature of 165°F (74°C) in the thickest part of the thigh, avoiding the bone.
Use a slotted spoon to transfer the onion, capers, and olives to a small gravy boat. Set aside. Pour the cooking liquid into a gravy separator. If you do not have a gravy separator, pour the sauce into a large glass measuring cup and spoon off the fat floating on top.
Pour the defatted sauce back into the Instant Pot and add the onion-olive mixture. Select Saute and adjust to medium heat. Simmer uncovered while finishing the chicken.
Set the broiler to high and adjust an oven rack to the upper third of the oven. Broil the chicken, rotating the baking sheet once, until golden brown, about 3 minutes. Remove from the oven. Carve the chicken and serve with the sauce.
Serves: 8 | Serving Size: 1/6 of the chicken (131g), 1/4 cup (59ml) sauce
I tend to fall into lunch hyper-fixations, and right now this cucumber crispy rice salad is at the top of the list. Past phases have included this caprese pasta salad and a broccoli Caesar salad, but this one might be my favorite yet. Think crisp cucumbers, irresistible bites of crispy rice, plenty of fresh herbs, and a tangy, creamy miso dressing that ties everything together.
It also happens to be one of the easiest lunches to prep ahead. This cucumber crispy rice salad comes together with
I tend to fall into lunch hyper-fixations, and right now this cucumber crispy rice salad is at the top of the list. Past phases have included this caprese pasta salad and a broccoli Caesar salad, but this one might be my favorite yet. Think crisp cucumbers, irresistible bites of crispy rice, plenty of fresh herbs, and a tangy, creamy miso dressing that ties everything together.
It also happens to be one of the easiest lunches to prep ahead. This cucumber crispy rice salad comes together with minimal hands-on time and only gets better as it sits. The vegetables add freshness and crunch, while the crispy rice and hearty protein make it satisfying enough to keep you full all afternoon.
Ingredients for This Cucumber Crispy Rice Salad
The ingredient list for this cucumber crispy rice salad is pretty simple, but each component brings something important to the dish—crunch, creaminess, brightness, or depth of flavor.
Rice. My favorite shortcut? The ready-made rice packets in the pasta aisle. I never thought I’d become a fan of pre-cooked rice, but it’s the ultimate hack for a quick meal. Day-old rice works beautifully too, but if you’re short on time, this grocery store staple gets the job done.
Cucumbers. These bring the fresh, cooling crunch that makes the whole salad feel light and vibrant.
Sugar snap peas. Their natural sweetness balances the umami-rich dressing while adding another layer of crisp texture.
Herbs. The more, the better. Cilantro, green onions, and dill are my favorites, but feel free to use whatever you have on hand.
Pickled onions. I love the sweet-tangy bite they add, but they’re totally optional if you want to keep things simple.
Tofu. Every good lunch needs protein. Torn tofu with craggy edges gets beautifully crispy, creating satisfying bites that will keep you full all afternoon.
Hummus. This is my cheat for an easy creamy salad dressing. Any ready made hummus mixed with a big squeeze of lemon is the key to a quick an easy lunch.
How to Prepare This Cucumber and Crispy Rice Salad
The best part of this salad is the crispy rice—and yes, you can make it ahead of time.
For the crispiest texture, use ready-made rice or day-old rice. The slightly drier grains crisp up beautifully in the oven, turning golden and crunchy for the perfect bite. Spread the rice in an even layer on a sheet pan, drizzle or spray with a little oil, and bake until golden brown, tossing halfway through. If you want to boost the flavor even more, try using a seasoned ready rice like cilantro-lime or spicy chili—though plain rice works just as well.
Because this salad leans more toward chopped salad territory, it helps to keep everything a similar size. Chop the cucumbers and snap peas into evenly sized pieces, and crumble the tofu into bite-sized chunks so every forkful gets a balanced mix of textures.
How to Store Leftovers
This cucumber crispy rice salad is an ideal make-ahead lunch. Because it doesn’t include leafy greens, it holds up beautifully in the fridge without getting soggy. I like to prep a batch and store it for up to 2–3 days, either dressed or undressed—the flavors actually get even better as everything sits together.
For easy grab-and-go lunches, portion the salad into mason jars or airtight containers. When lunchtime rolls around, you’ll have a satisfying, flavor-packed meal ready to go.
Other Favorite Make-Ahead Lunches
If you’re in a lunch prep groove, here are a few other favorites our team turns to again and again:
Rainbow Grain Bowl. A great component-prep lunch that comes together in minutes.
Hummus Toast with Tomatoes. Toast is one of the easiest lunch hacks for something quick, delicious, and satisfying.
Asparagus Frittata. A make-ahead egg bake packed with protein that’s easy to slice and pack for lunch throughout the week.
Crisp the rice and tofu. Preheat the oven to 400°F and line a sheet pan with parchment paper. Spread the rice in an even layer on one side of the pan and drizzle lightly with oil. Crumble the tofu onto the other side, drizzle with oil, and season as desired. Bake for about 20 minutes, flipping both halfway through, until the rice is golden and crispy and the tofu is lightly browned. Set aside to cool slightly.
Assemble the salad. Chop the cucumbers, snap peas, and herbs, then add them to a large serving bowl. Add the crispy rice and tofu, toss with hummus and lemon juice, and serve chilled.
Collagen-rich and deeply flavorful, there’s a reason this thrifty cut is a favorite of home cooks and chefs alike. Oxtail contains meat, bones and cartilage, which melt into a delicious sauce when braised in the slow cooker. Look for meaty pieces that are at least 2 ½-3 inches or larger in diameter for the best value.
RD Tip: If oxtail is hard to find, you can swap them out with just about any meat-on-the-bone, like short ribs, beef shanks, or even bone-in chicken thighs.
Slow Cooker Braised Oxt
Collagen-rich and deeply flavorful, there’s a reason this thrifty cut is a favorite of home cooks and chefs alike. Oxtail contains meat, bones and cartilage, which melt into a delicious sauce when braised in the slow cooker. Look for meaty pieces that are at least 2 ½-3 inches or larger in diameter for the best value.
RD Tip: If oxtail is hard to find, you can swap them out with just about any meat-on-the-bone, like short ribs, beef shanks, or even bone-in chicken thighs.
Slow Cooker Braised Oxtail and Carrots
Ingredients
4 lb. (1814g) oxtails
1 tsp ground black pepper
1/2 tsp salt
1 tbsp olive oil
3 tbsp no salt-added tomato paste
1/2 cup (113g) dry red wine (such as Pinot Noir or Merlot)
2 cups (360g) low-sodium beef broth
1 tsp granulated garlic or garlic powder
2 bay leaves
1 small sprig rosemary
1 large yellow onion, chopped
3 large carrots (475g), cut into 1/2-in. thick coins
2 celery stalks, sliced
1 large parsnip, chopped
2 tbsp cornstarch
Directions
Season the oxtails with pepper and salt. Heat the oil in a large non-stick pan over medium-high heat. When the oil is hot, add the oxtails to the pan (in batches if needed, to avoid overcrowding the pan.) Cook, turning occasionally, until browned all over, about 10 minutes. Add to the slow cooker.
Pour off the fat in the pan. Return the pan to medium-high heat and add the tomato paste. Cook, stirring constantly, about 2-3 minutes, or until it begins to brown. Add the wine and simmer for another 1 minute, scraping up the brown bits on the bottom of the pan. Add the broth, granulated garlic, rosemary and bay leaves and stir to combine.
Pour the wine mixture over the oxtails in the slow cooker. Nestle the celery and onion around the oxtail. Cover and cook on low in a large (6.5qt/6L) slow cooker for 8–9 hours (or on high for 4-5 hours) until oxtail reaches an internal temperature of 190-205°F, adding the parsnips and carrots during the last 2-3 hours of cooking.
Transfer the oxtails and vegetables to a large serving bowl with a slotted spoon. Discard the bay leaves and rosemary sprig. Cover meat and vegetables with foil. Set aside.
Pour the cooking liquid into a gravy separator and let it stand for a few minutes so the fat rises; discard the fat (alternatively, pour the cooking liquid into a large measuring cup, let sit for a few minutes, then spoon the fat off the top and discard.) Pour the defatted cooking liquid into a small saucepan. Bring the cooking liquid to a boil over medium-high heat and simmer for 4 minutes.
In a small bowl, combine the cornstarch with 2 tbsp water and stir to combine. Add to the cooking liquid and simmer until thickened, about 2 minutes. Season sauce with additional salt and pepper, if desired. Pour the sauce over the oxtails and vegetables and serve.
Serves: 6 | Serving Size: 2 medium oxtails, 2/3 cup vegetables, 1/3 cup sauce
pring has a way of making you want to cook again. The farmer’s market is suddenly worth the trip, the produce drawer is full of things that are actually exciting, and dinner feels less like a chore and more like an occasion.
Pasta is our answer to all of it. Light, fresh, and endlessly adaptable, it’s the perfect vehicle for spring’s best offerings: asparagus, artichokes, peas, broccolini, arugula, mint. These aren’t the heavy, wintery pasta dishes you’ve been leaning on since October. These
pring has a way of making you want to cook again. The farmer’s market is suddenly worth the trip, the produce drawer is full of things that are actually exciting, and dinner feels less like a chore and more like an occasion.
Pasta is our answer to all of it. Light, fresh, and endlessly adaptable, it’s the perfect vehicle for spring’s best offerings: asparagus, artichokes, peas, broccolini, arugula, mint. These aren’t the heavy, wintery pasta dishes you’ve been leaning on since October. These are bright, fast, and built for open windows and longer evenings.
9 Spring Pasta Recipes Worth Adding to Your Rotation
Consider this your permission slip to eat pasta all season long.
Lemon Ricotta Pasta
Zucchini melts into a silky, creamy sauce that clings to every noodle—brightened with lemon, artichokes, and kale. Think of it as the secret ingredient you’d never guess.
Loaded with in-season vegetables, chickpeas, and a dressing bursting with basil, spinach, and chives, this vegan pasta salad is made for spring gatherings—and even better the next day. Don’t you love when that’s the case?
Lemony Spring Pasta Salad with Olives, Artichokes, and Bacon
Crispy bacon, briny artichoke hearts, and peppery arugula come together in a bright blender dressing The kind of pasta salad that earns a permanent spot in your spring rotation (and takes a total of less than 30 minutes to make).
All the comfort of mac and cheese, packed with spring vegetables and ready in one pot. The orzo absorbs everything as it cooks, making this one as easy to clean up as it is to eat.
Blistered Broccolini Pasta with Garlic, Lemon & Toasted Breadcrumbs
Charred broccolini, tons of garlic, and a squeeze of lemon—finished with toasted breadcrumbs that add the crunch this pasta was made for. Simple ingredients, big payoff.
Five ingredients, one very vibrant sauce—peas, asparagus, spinach, basil, and parmesan make this the greenest pasta on the list. Peak spring in a bowl.
Light, satisfying, and weeknight-easy, this is Camille’s go-to answer when dinner inspiration runs dry. Frozen peas are the secret weapon you didn’t see coming.
This weeknight interpretation of the classic Alsatian dish is a hearty meal of sausage, cabbage and potatoes — and it’s perfect for fall. This version takes the whole dish and makes it happen on a sheet pan for ease. Be sure to use a rimmed baking sheet to prevent the ingredients from sliding off.
Active time: 10 minutes | Total time: 45 minutes
Sheet Pan Sausage Choucroute Garnie
Ingredients
1 small head red cabbage, cut through the core into eight 1/2-inch thick wedges
1 lb (453g) baby red po
This weeknight interpretation of the classic Alsatian dish is a hearty meal of sausage, cabbage and potatoes — and it’s perfect for fall. This version takes the whole dish and makes it happen on a sheet pan for ease. Be sure to use a rimmed baking sheet to prevent the ingredients from sliding off.
Active time: 10 minutes | Total time: 45 minutes
Sheet Pan Sausage Choucroute Garnie
Ingredients
1 small head red cabbage, cut through the core into eight 1/2-inch thick wedges
1 lb (453g) baby red potatoes, halved if large
1 apple, such as Honeycrisp or Granny Smith, halved, cored and sliced 1/4-inch thick
1 small yellow onion (125g), halved, peeled and cut through the root into 1/4-inch thick wedges
2 tbsp olive oil
1 tbsp apple cider vinegar
1 tsp cumin or caraway seeds
1/2 tsp yellow mustard seeds
1/4 tsp salt
1/2 tsp black pepper
4 precooked chicken-apple sausages
1/4 cup parsley, roughly chopped
Directions:
Preheat the oven to 450°F (230°C) and line a large rimmed baking sheet with aluminum foil.
In a large bowl, gently toss the cabbage, potatoes, apple, onion, olive oil, apple cider vinegar, cumin, and mustard seeds. Season with salt and pepper. Spread the mixture in a single layer on the prepared baking sheet and roast for 15 minutes.
Remove the baking sheet from the oven and use a spatula to flip the vegetables and apples. Arrange the chicken sausages on top and return to the oven. Roast for about 10-12 minutes more, or until the sausages reach an internal temperature of 165°F and are browned and the cabbage is crisp-tender. Let cool for 5 minutes.
Garnish with parsley and serve immediately.
Serves: 4 | Serving Size: 1 sausage and 1 1/2 cups of vegetables