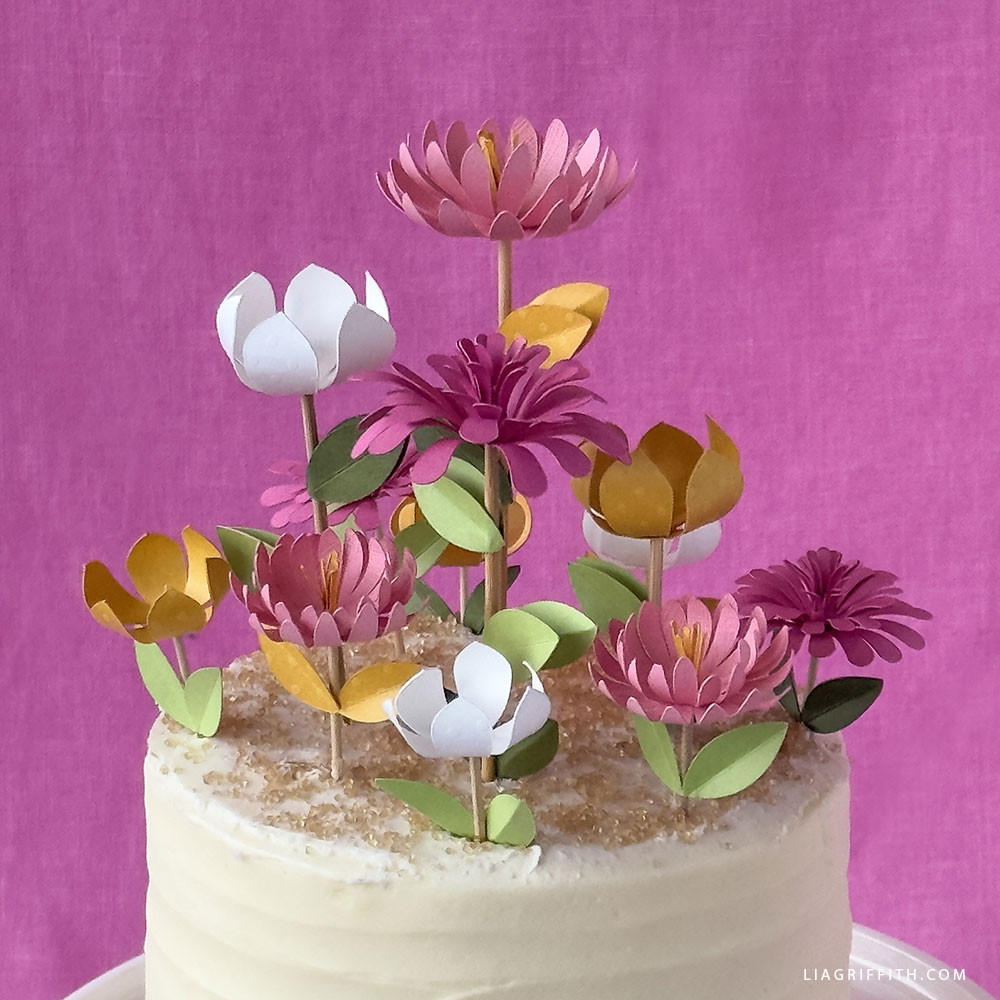
What transforms a cake from merely delicious to spectacular? It’s not the yummy frosting or the colorful sprinkles—it’s the special handmade touches that make a cake truly memorable. These Paper Spring Flower Cake Toppers bring height, color, and just enough drama to turn a simple dessert into the centerpiece of your table. Bring them out for birthdays, Mother’s Day, or any other occasion that could use a homemade touch.
The post Paper Spring Flower Cake Toppers appeared first on Lia Griffith.
What transforms a cake from merely delicious to spectacular? It’s not the yummy frosting or the colorful sprinkles—it’s the special handmade touches that make a cake truly memorable. These Paper Spring Flower Cake Toppers bring height, color, and just enough drama to turn a simple dessert into the centerpiece of your table. Bring them out for birthdays, Mother’s Day, or any other occasion that could use a homemade touch.
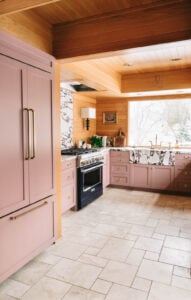
Ever since the pandemic, interior trends have been leaning towards bold, maximalist styles and colors. Lockdown taught us collectively that life is short, and more time spent at home has invited many to throw caution to the wind. If this is where we’re spending a large amount of our time, we should really love the space we’re inhabiting. Right? Say goodbye to sad beige and millennial gray—whimsy, playfulness, and color are in. The brighter, the better!
Ahead, I chatted with designers to get
Ever since the pandemic, interior trends have been leaning towards bold, maximalist styles and colors. Lockdown taught us collectively that life is short, and more time spent at home has invited many to throw caution to the wind. If this is where we’re spending a large amount of our time, we should really love the space we’re inhabiting. Right? Say goodbye to sad beige and millennial gray—whimsy, playfulness, and color are in. The brighter, the better!
Ahead, I chatted with designers to get their take on bright paint colors—how to choose them, where to paint, trending colors, and perhaps most importantly, how to get over any hesitancy when working with vibrant hues.
Choosing the right color for your home is a very personal decision. Lesley Myrick of Lesley Myrick Interior Design always starts her design process with the client, and never a trend. “A vibrant paint color has to be a commitment color, something you’ll still love when the design world moves on to the next thing,” she says. Myrick suggests paying attention to the colors you like to wear, what colors are already present in the room, and what the light is doing between 8 am and 8 pm.
“Vibrant color is high impact, which means it can’t be an afterthought. It has to be rooted in something specific and personal. Otherwise, you end up with a room that just looks loud instead of layered,” she continues.
In short, pick a color you love. Be sure it plays well with the other items in your space. Take the time to see how the light affects the paint color throughout the day. Have fun!
What Rooms Are Best for Vibrant Paint Colors?
Bright paint colors will energize a space, so opting for rooms that are lively, or are perhaps in need of some zest will work well. “A small space is the best place to go bold, because the color wraps around you and creates a complete mood,” Myrick says. “A powder room in a deep, glossy green or a saturated blue is going to be the most memorable room in the house.”
“I always recommend an entry way or hallway as great spaces to introduce vibrancy,” Daniele Doerge, a color expert from California Paints, shares. “From there, I love dining rooms and living rooms for vibrant tones as well. These areas are natural spaces to gather, and having a strong color can feel inviting and expressive.”
Myrick agrees. “Dining rooms are another natural fit, especially because you typically use them at night, when rich color looks its absolute best in low light,” she adds.
Hesitant to Use Vibrant Bright Colors in Your Home?
Neutrals can feel safe, and especially if you have maximalist tendencies, even a bit boring. But covering a room in a bright blue, cheery yellow, or bold chartreuse requires a healthy dose of courage. It’s totally normal to feel hesitant. Both Myrick and Doerge have a few tips to help calm your nerves.
Test Out Paint Samples
“First, paint is the least permanent design decision you will ever make,” Myrick reassures. “If you hate it in three years, you paint over it—that’s it. A bold color is not the irreversible commitment people think it is.” She also suggests getting large samples, painting them on two different walls, and living with them for a few days to make an informed decision. “Look at them in morning light, afternoon light, and at night. The same color will shift dramatically depending on the room and the time of day,” she shares.
Start Small
“Try painting cabinets or an interior door, or even add in an accent wall to see how you feel with the color,” Doerge recommends. “I also advise people to pair bold colors with some sort of grounded neutral or texture—whether that’s furniture, decor, or rugs.”
Go Bold or Go Home
Finally, Myrick recommends digging your heels in and committing with your full chest. “The half-hearted vibrant color, the one that felt ‘safer’ than the bold choice you loved, always disappoints. If you’re going to go bold, go all the way,” she urges.
What Bright Paint Colors Are Big Right Now?
Even though vibrant colors are inherently energizing, the right bold color can still feel calming and intentional. Colors inspired by nature are always a wise choice. “We’re seeing some trends towards vibrant colors rooted in nature—think golden yellows, clay-inspired corals, and lush greens that feel bright but still grounded,” Doerge shares.
If there’s one thing designers agree on, it’s this: the color you love is always the right choice. Bright paint colors aren’t a trend to chase or a risk to manage — they’re an invitation to make your home feel more like you. Start with the room that needs the most life. Paint a large sample. Live with it for a few days. And when you find the one that makes you feel something every time you walk in? Commit all the way. The half-hearted choice always disappoints. The bold one never does.
This post was last updated on May 22, 2026, to include new insights.
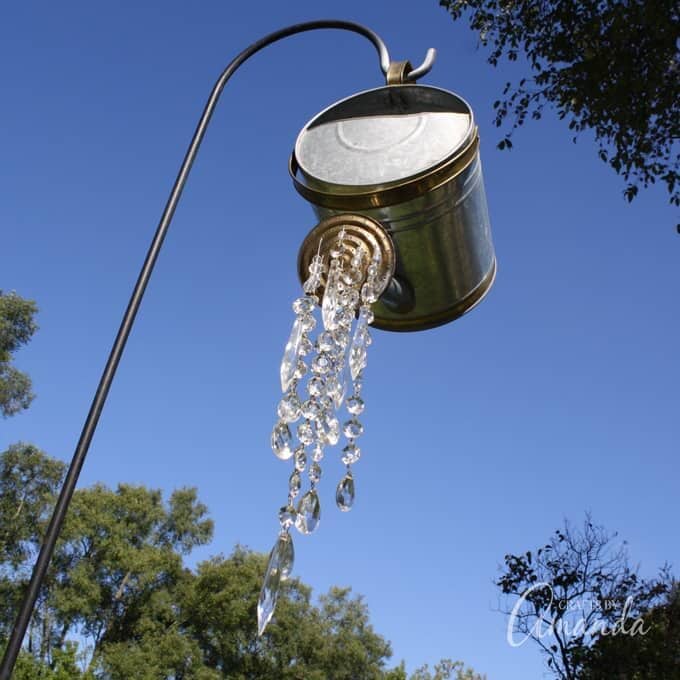
My neighbor and good friend, Debra, made this wonderful DIY yard art from an old watering can and hanging crystals from an old chandelier. The light from the sun reflects off of the crystals, making it shine brilliantly. Watering Can That Pours Crystals This watering can is the perfect whimsical garden decoration. It would look gorgeous... Go To project
The post A Watering Can That Pours Crystals appeared first on Crafts by Amanda.
My neighbor and good friend, Debra, made this wonderful DIY yard art from an old watering can and hanging crystals from an old chandelier. The light from the sun reflects off of the crystals, making it shine brilliantly. Watering Can That Pours Crystals This watering can is the perfect whimsical garden decoration. It would look gorgeous... Go To project
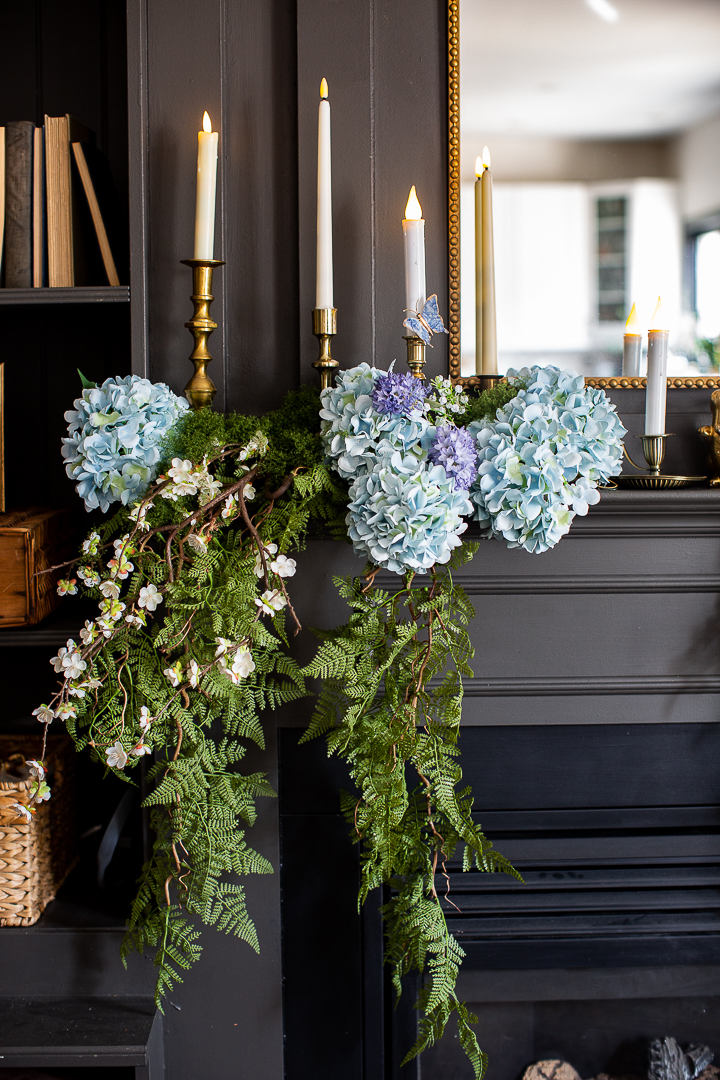
Hello friends. I hope you’ve been keeping well. It’s been a little while since I posted. I’m not even sure if anyone is reading this blog anymore but regardless, here is a pretty Spring Mantel I put together a couple of weeks ago.
I used blue hydrangeas and these beautiful ferns. I bought these to make wreaths for our front doors and will still be using them…
But I just started to play with them on the mantel and thing led to the other a
Hello friends. I hope you’ve been keeping well. It’s been a little while since I posted. I’m not even sure if anyone is reading this blog anymore but regardless, here is a pretty Spring Mantel I put together a couple of weeks ago.
I used blue hydrangeas and these beautiful ferns. I bought these to make wreaths for our front doors and will still be using them…
But I just started to play with them on the mantel and thing led to the other and here we are.
It’s fun to play with decor and just see what turns out.
As usual, I took a lot of photos. I just enjoy taking photos and editing them.
I remember the good old days when photos and pretty pictures brought me so much joy. Nowadays, it seems like fast video is the thing,
Don’t get me wrong, I also enjoy creating videos but I miss the old blogging days so much.
Anyway, I hope you’re keeping well and hope to see you again soon.
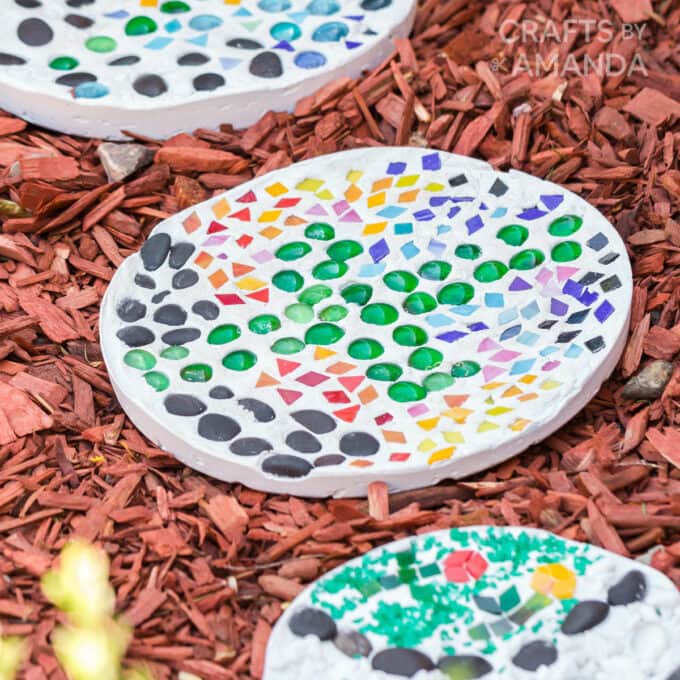
A sunny summer day is perfect for creating DIY garden stepping stones! Kids will love creating their own designs and these flat stones can decorate a garden, walkway, or anywhere outside that needs a little love or personalization. Why this tutorial works This project is an easy introduction to mosaics, which means it’s a great... Go To project
The post DIY Garden Stepping Stones appeared first on Crafts by Amanda.
A sunny summer day is perfect for creating DIY garden stepping stones! Kids will love creating their own designs and these flat stones can decorate a garden, walkway, or anywhere outside that needs a little love or personalization. Why this tutorial works This project is an easy introduction to mosaics, which means it’s a great... Go To project
My biggest issue with the term junk drawer is the word junk. If something truly has no purpose, why are we storing it in valuable space in our kitchen, mudroom, or office? Now don’t get me wrong—I’m not saying everything in your junk drawer needs to be high quality or particularly valuable. What it does need to do, however, is serve a purpose.
When organizing any space in your home—from your fridge to your closet—every item should earn its keep. If you don’t wear those black pumps, donate th
My biggest issue with the term junk drawer is the word junk. If something truly has no purpose, why are we storing it in valuable space in our kitchen, mudroom, or office? Now don’t get me wrong—I’m not saying everything in your junk drawer needs to be high quality or particularly valuable. What it does need to do, however, is serve a purpose.
When organizing any space in your home—from your fridge to your closet—every item should earn its keep. If you don’t wear those black pumps, donate them. If you keep buying that bag of spinach but never finish it, it might be time to re-evaluate. The items in your junk drawer should follow the same rule.
Once you stop thinking of it as a catch-all space and start thinking of it as a utility drawer with a purpose, it becomes much easier to keep organized. Below is my step-by-step system for organizing a junk drawer so it actually stays that way.
Rachel Rosenthal
Rachel Rosenthal is an organizing expert and founder of Rachel and Company, a Washington, DC-based professional organizing firm. Since 2007, Rachel’s firm has worked with 3000+ clients and teamed up with prominent brands, including West Elm, Pottery Barn, The Container Store, and Four Seasons. Rachel’s expertise has been featured in 100+ publications, including Real Simple, Martha Stewart, House Beautiful, The Rachael Ray Show, and local NBC, ABC, and Fox morning shows. Rooted in the belief that organization can be achieved by all, Rachel emphasizes solutions that are easy to use and enhance a home’s existing aesthetic.
How to Organize a Junk Drawer (Quick Steps)
If you want the quick version, here’s the simple system I use:
Empty the drawer completely
Declutter broken or unused items
Relocate items that belong elsewhere
Create categories for what remains
Add drawer organizers or dividers
Return items thoughtfully—and prep them for use
Now let’s break down each step.
Why Junk Drawers Get Out of Control
The biggest problem with a junk drawer is the catch-all mentality. We’ve been conditioned to toss items we don’t know what to do with into one drawer and deal with them later. That’s how you end up with drawers bursting at the seams and never being able to find the battery you know you have, or the matchbook you need when the power goes out.
Just like every other space in your home, your junk drawer should contain intentional categories. When every item has a place, the drawer becomes useful instead of chaotic. Changing your mindset from “junk drawer” to a drawer that holds categorized items with purpose is the first step in organizing it.
Step-by-Step Guide to Organizing a Junk Drawer
Step 1: Empty the Junk Drawer Completely
Yes, everything. I know the thought of it can make most of us wince, but the first step to organizing your junk drawer is to dump it all out. It’s the only way to see exactly what you’re working with. Once the drawer is empty, wipe it down so you’re starting with a clean slate.
Step 2: Declutter and Remove Broken Items
Next, declutter the items you pulled out of the drawer. Some things will be obvious—like tossing trash or recycling old receipts. But don’t stop there. Write with each pen to make sure it works. Test batteries. Turn on flashlights. Check tape rolls. You might be surprised how many items in a junk drawer are actually broken or unusable. Think through which items you truly need in your home and which ones can be discarded or donated.
Step 3: Relocate Items That Belong Elsewhere
After decluttering, look at what remains and decide whether it actually belongs in this drawer.
For example:
Does your screwdriver need to live in the kitchen, or should it go in the garage or toolbox?
Is that ruler better suited for the kids’ homework area?
Should extra charging cables live in an office drawer instead?
Relocating items helps prevent your junk drawer from becoming a storage space for things that belong elsewhere.
Step 4: Create Categories for What’s Left
Once you’ve decluttered and relocated items, you’ll be left with the things that truly belong in the drawer. Now it’s time to create categories.
For example:
Scissors
Tape
Batteries
Pens and pencils
Rubber bands
Small tools
Chargers
Grouping items into categories makes it much easier to find what you need—and maintain the system over time.
Step 5: Add Drawer Organizers or Dividers
Once you’ve identified your categories, measure your drawer so you can add organizers that fit. Some type of bins or drawer dividers is essential for junk drawer organization. Because these drawers often contain multiple categories, organizers prevent everything from sliding together into one big pile.
Measure the width, depth, and height of the drawer, then find organizers that fit your space and categories. Adjustable dividers, small bins, or modular trays all work well. Think of it like playing a little Tetris until everything fits perfectly.
Step 6: Put Everything Back (and Prep It for Use)
Now comes the satisfying part—putting everything back. Place each category into its designated organizer or section. But before you close the drawer, take it one step further.
This step will be unique to your junk drawer, but consider sharpening pencils, folding the end of the tape over so it’s easy to grab, refilling a lighter, or pairing batteries by size. These small finishing touches make a big difference. Now everything in your junk drawer is ready to be used at a moment’s notice.
What Should Actually Go in a Junk Drawer?
A well-organized junk drawer typically holds small, frequently used household items that don’t have another obvious home.
Some common items include:
Batteries
Scissors
Tape
Rubber bands
Pens and pencils
Flashlight
Matches or lighters
Phone chargers
Small tools like a screwdriver
The key is that every item serves a purpose and belongs to a category within the drawer.
Common Junk Drawer Organization Mistakes
If your junk drawer never seems to stay organized, one of these habits might be the reason.
Treating it like a catch-all. A junk drawer should not be where random items go to disappear.
Keeping broken items. Dead batteries, dried-out pens, and tangled cords create clutter quickly.
Not using drawer dividers. Without organizers, everything slides into one chaotic pile.
Mixing too many categories. Limiting the drawer to a few simple categories helps keep it functional.
Never editing the drawer. A quick reset every few months keeps clutter from building up again.
How to Keep Your Junk Drawer Organized
Once your drawer is organized, a little maintenance will go a long way toward keeping it that way. A quick five-minute reset once a month can help prevent clutter from building up—use that time to toss broken items, test pens, or remove anything that’s found its way into the drawer without a real purpose. Try to return items to their designated sections after using them so categories stay intact, and be mindful about what you add back in. If something doesn’t serve a clear purpose, it likely doesn’t need to live there.
A junk drawer doesn’t need to be perfect, but with a simple system in place, it can stay functional, tidy, and easy to use.
Organize Your Junk Drawer With the Help of These Hard-Working Products
Once your drawer is decluttered and categorized, the right organizers make all the difference. Drawer dividers, small bins, and modular trays keep items from shifting around and turning back into one big pile.
The right tools help ensure that every item in your drawer has a home—and stays there.
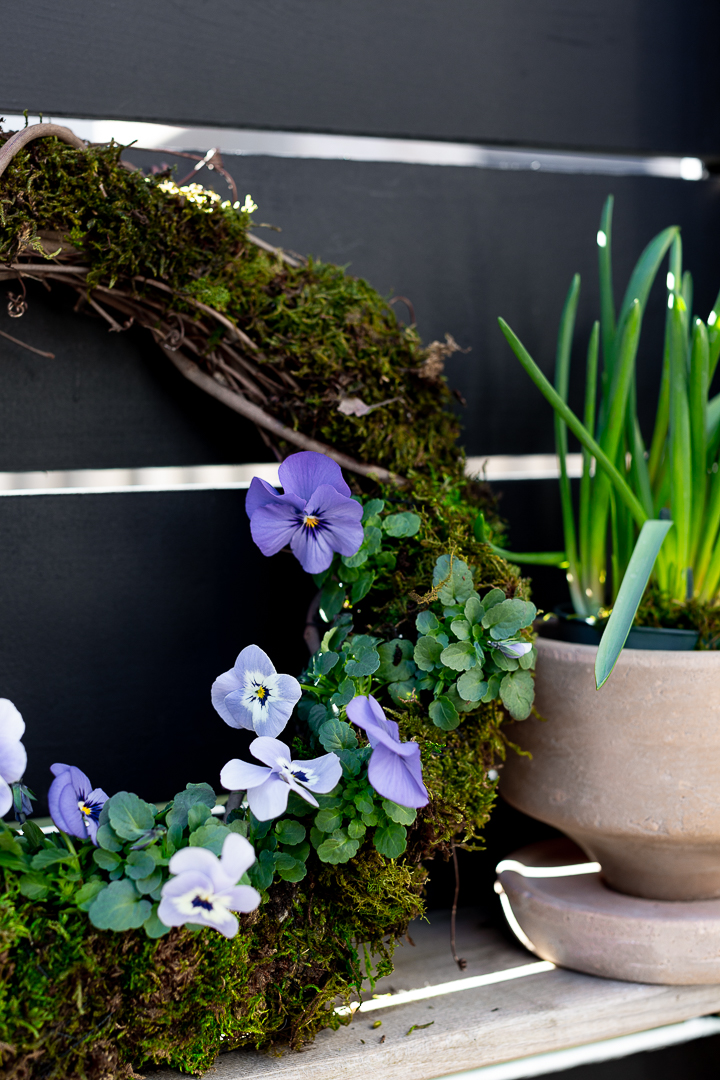
Hello again friends. It’s been snowing and Spring does not seem to be anywhere near, but I’m taking matters into my own hands.
I made this pretty living spring wreath using pansies and some moss.
The day I made it, the sun was shining and I actually sat outside to make this wreath. But alas, it was just a little tease from Mother Nature.
I started by taking the pansies out of their pot…
Soaked some moss in water ….
And wrapped the pansies with the moss…
I used black thread to hold it together….
I then just used the same string to wrap the pansy ‘moss balls’ to the wreath…
So easy and I love how beautiful it looks. To water it, I spray it everyday and because pansies are so hardy, it’s going to last a long time.
I love it.
I took a lot of photos because it was so nice outside and I was enjoying the little break of winter weather. Sadly, it’s been snowing
and cold so I brought the wreath inside. I can’t wait to display it outside and for Spring to finally show up.
In uncertain, often overwhelming times, I’ve found solace in my houseplants. There’s a joy in tending to them—the ritual of watering, the slow unfurl of a new leaf, and the way a room softens in their presence. Over time, my home has filled with them.
But somewhere along the way, I realized: more plants didn’t necessarily mean a more beautiful space. Too many, placed without intention, and suddenly a living room starts to feel less like a sanctuary and more like a roadside nursery. What I wa
In uncertain, often overwhelming times, I’ve found solace in my houseplants. There’s a joy in tending to them—the ritual of watering, the slow unfurl of a new leaf, and the way a room softens in their presence. Over time, my home has filled with them.
But somewhere along the way, I realized: more plants didn’t necessarily mean a more beautiful space. Too many, placed without intention, and suddenly a living room starts to feel less like a sanctuary and more like a roadside nursery. What I was craving wasn’t more greenery—it was a sense of cohesion. A way to make my plants feel like part of the design, not an afterthought.
So I set out to understand how designers actually style plants at home. What I found, through conversations with San Francisco-based Little Trees owner Kathy Ho and Lindsay Pangborn, formerly a gardening expert at Bloomscape, is that the difference comes down to perspective. Plants aren’t just décor—they’re a design layer. And when you start to think about them that way, everything shifts: where you place them, how you group them, and how they shape the feeling of a room.
How to Design With Plants (By Thinking Like a Designer)
When you start to see plants as a design element—not just something to care for—the way you use them begins to change. It’s easy to slip into collecting mode. You find a plant you love, then another, then another—and before long, they’re scattered throughout your home with little thought for how they relate to one another.
Designers approach plants differently. Instead of asking Where can I fit this? they ask, What does this room need?
That shift—from accumulation to intention—creates a space that feels considered.
“Plants should complement your space and your lifestyle, not compete with it,” Pangborn says. In practice, that means thinking about plants the same way you would any other design element: in terms of scale, balance, and placement.
A single, well-placed plant can anchor a corner. A small grouping can create a focal point on a surface. Even negative space—what you choose not to fill—plays a role in how your plants are experienced.
1. Create Visual Moments (Not Plant Clutter)
Once you start thinking like a designer, the next step is editing—then arranging with intention. Instead of dispersing plants evenly throughout a room, focus on creating a few defined moments. Designers often group plants in twos or threes, treating them less like standalone objects and more like part of a vignette. The result feels grounded and cohesive, rather than scattered.
“Grouping plants can make a space feel more calm and considered,” says Ho. “It also makes care easier when plants with similar needs are placed together.”
Think of a cluster on a coffee table, a styled corner of a console, or a small trio anchoring a shelf. What matters isn’t the number of plants—it’s how they relate to one another and to the space around them.
Just as important: what you leave out. Giving each grouping room to breathe allows the eye to land, rather than constantly move.
One of the simplest ways to elevate your plant styling is to think vertically. When every plant sits at the same level—lined up on a windowsill or clustered at eye height—the effect can feel flat. Designers, instead, use plants to create movement throughout a space, guiding the eye up, down, and across the room.
Trailing plants are especially effective here. Placed on a high shelf, bookshelf, or cabinet, they soften hard lines and draw the eye upward as they grow. Hanging planters offer a similar effect, making use of often-overlooked ceiling space while adding a sense of lightness.
“Using vertical space is key, especially in smaller homes,” Pangborn notes. “It allows you to incorporate more greenery without sacrificing surface area.”
The goal isn’t to fill every level, but to create a sense of rhythm—something that feels layered and lived-in, rather than static. A taller plant on the floor, a cluster at mid-level, and something trailing above can be enough to shift the entire energy of a room.
3. Let Plants Fill the Space—Not Overwhelm It
One of the most common mistakes when decorating with plants is treating every empty spot as an opportunity to add one. But designers tend to approach it the opposite way. Instead of filling space, they use plants to resolve it.
That might look like placing a taller plant in an empty corner to soften a hard edge, or using a single, sculptural plant to anchor a blank wall. On the floor, especially, plants can create a sense of weight and presence—grounding the room in a way smaller accents can’t.
“Larger plants can make an immediate impact,” Pangborn says. “They help define a space and can bring balance to areas that feel unfinished.”
Just as important is what surrounds them. Giving a plant enough space—away from furniture, walls, or artwork—allows it to stand on its own without competing for attention.
A room doesn’t feel lush when every inch is filled. It feels lush when there’s contrast—between fullness and openness, presence and pause.
4. Balance Scale, Shape, and Texture
If you’re drawn to a home filled with plants, the key is to create contrast. A room full of greenery can feel rich and layered, but only when there’s variation. When every plant is similar in size, shape, or tone, the effect flattens. What designers do instead is mix elements deliberately: pairing something tall with something low, something structured with something soft, something bold with something more delicate.
“Combining plants with different leaf shapes and sizes keeps a space visually interesting,” Pangborn says. “It creates depth rather than repetition.”
Think of a broad-leaf plant set against something more airy, or a sculptural silhouette next to a trailing vine. These contrasts give the eye somewhere to move and a reason to linger.
The effect is what people often describe as a “lush” space, but what it really comes down to is composition. Not more plants, but better balance.
Design for Real Life, Not Just Aesthetics
Even the most beautifully styled plants should support the way you actually live in your space. It’s easy to get caught up in how something looks—especially when it comes to plants, which can instantly transform a room. But if they’re difficult to care for, constantly in the way, or require more attention than you can realistically give, that sense of ease starts to disappear.
“Plants should complement your space and your lifestyle,” Pangborn notes. “They should never feel like a burden.”
That might mean grouping plants with similar care needs so your routine feels intuitive. Or choosing fewer, more impactful pieces that you can tend to consistently. It might even mean moving things around as your space (or your energy) shifts.
When you start to see plants as part of your home’s design, the entire approach softens. You edit more. You place with intention, and you let the space breathe.
In turn, your home begins to feel the way you wanted it to all along: lush, yes—but also calm, cohesive, and entirely your own.
This post was last updated on April 17, 2026, to include new insights.
The upcycled framed print set is a great way to create budget-friendly decor for your home! Hello friends, and happy Trashy Treasure Tuesday! It’s that time again. When a few friends and I get together and share our latest “trashy treasures”. Be sure to scroll all the way down to check out their makeovers, too!...
The post Upcycled Framed Print Set appeared first on Artsy Chicks Rule®.
The upcycled framed print set is a great way to create budget-friendly decor for your home! Hello friends, and happy Trashy Treasure Tuesday! It’s that time again. When a few friends and I get together and share our latest “trashy treasures”. Be sure to scroll all the way down to check out their makeovers, too!...
These organic curved mirrors were just what this space needed! Plus, a new spot for my recently created framed prints! Good morning, friends! I’m back today to share what I did with the spaces on our wall where I recently shared the framed print set I made. Those were a bit too small for the...
The post Organic Curved Mirrors – Unique and Quirky appeared first on Artsy Chicks Rule®.
These organic curved mirrors were just what this space needed! Plus, a new spot for my recently created framed prints! Good morning, friends! I’m back today to share what I did with the spaces on our wall where I recently shared the framed print set I made. Those were a bit too small for the...