Reading view

9 Tips for Decorating Your Christmas Tree with Ribbon at Home

Every year, decorating the Christmas tree feels like both a joy and a challenge. You pull out your favorite ornaments, add the lights, and yet something still looks unfinished. The tree doesn’t have that full, elegant look you see in holiday magazines or Pinterest boards.

The secret often comes down to one simple detail, decorating Christmas tree with ribbon. Ribbon can completely change how your tree looks, adding texture, depth, and a professional touch without much effort or expense.

But how do you make it look right, not messy, stiff, or overdone and turn an ordinary tree into a stunning holiday centerpiece?

Why You Should Add Ribbons to Your Christmas Tree?

Why You Should Add Ribbons to Your Christmas Tree?

Ribbons instantly enhance the look of your Christmas tree. They make it appear fuller, more cohesive, and professional without spending a lot.

Here’s why ribbons are a must-have for the holiday season:

  • They tie all the colors of your ornaments together.
  • They add softness and visual layers between branches.
  • They reflect the lights beautifully, giving your tree a glowing, festive charm
  • They’re affordable, reusable, and easy to style in different ways.

Once you’ve selected your ribbons, knowing the easy tips in decorating Christmas tree with ribbon can turn a simple tree into a stunning holiday centerpiece.

How to Decorate Your Christmas Tree With a Ribbon?

decorating christmas tree with red and blue ribbon

1. Pick the right ribbon material

The type of ribbon you choose sets the tone of your Christmas tree’s look. Each material adds a unique texture and mood that complements different holiday themes.

Ribbon Type Description Best For
Satin Smooth, shiny, and elegant for a timeless holiday look. Classic and formal Christmas themes
Velvet Rich and luxurious; perfect for cozy and classic styles. Warm, traditional, or vintage trees
Burlap Rustic and natural, great for farmhouse or woodland trees. Country, rustic, or nature-inspired themes
Wired-edge Ribbon Holds its shape well for bows, loops, and spirals. Creative designs and structured decorations

Choose your ribbon based on your tree’s theme, color palette, and lighting to achieve a balanced, polished look. The right material sets the foundation, but the magic truly happens when the colors and patterns work in harmony with your overall décor.

2. Choose complementary colors and patterns

Start by matching your ribbon colors with your ornaments or room décor. Popular combinations include:

  • Classic red and gold
  • Winter white and silver
  • Champagne and metallic tones
  • Rustic neutrals with earthy greens

Mixing two to three ribbon styles creates depth and dimension without overwhelming the design. Combining different textures or finishes adds subtle contrast that makes your tree look more dynamic and refined.

woman decorating christmas tree with ribbon and measuring it

3. Measure before you start

Avoid running out of ribbon mid-decorating, it’s one of the most common mistakes when decorating Christmas tree with ribbon. Use this rule of thumb: 10–15 yards of ribbon per foot of tree height.

For example, a 7-ft tree may need 70–100 yards depending on your style.

  • Wider ribbons (2.5–4 inches): Bold, dramatic look
  • Narrow ribbons (1–2 inches): Great for layering

Always buy a bit extra. Leftovers are better than gaps.

4. Prepare Your Tree First

Before you begin decorating your Christmas tree with ribbon, take time to prepare your tree properly. This step sets the foundation for a balanced and beautiful design that looks full from every angle.

  1. Fluff your branches to make the tree look full and natural.
  2. Add lights first, weaving them in and out of the branches for even brightness.
  3. Place large ornaments before adding ribbon for a well-balanced layout.

A little preparation goes a long way in making your decorations easier to arrange and your ribbons stand out beautifully.

BB Crafts Tip: Decorating with ribbon after the lights ensures your placement stays visible and balanced.

close up image of decorating christmas tree with ribbon

5. Anchor the Ribbon at the Top

When decorating Christmas tree with ribbon, starting at the top helps maintain a symmetrical and professional look from every angle.

Secure your ribbon by:

  • Tucking it into sturdy branches
  • Using ornament hooks
  • Using floral wire
  • Hiding the top ends behind your tree topper

This creates a seamless and clean look from the start.

6. Try different ribbon techniques

  • Horizontal Wrap: Wrap the ribbon around the tree in a spiral pattern for a uniform, traditional look.
  • Vertical Cascade: Let long tails of ribbon flow from the top to the bottom for a dramatic, elegant effect.
  • Spiraled Flair: Wrap at an angle for a dynamic design with movement and energy.

Try out these three techniques and adjust as you go to find the style that best complements your tree’s shape and theme.

blue ribbon bows as decoration for christmas tree

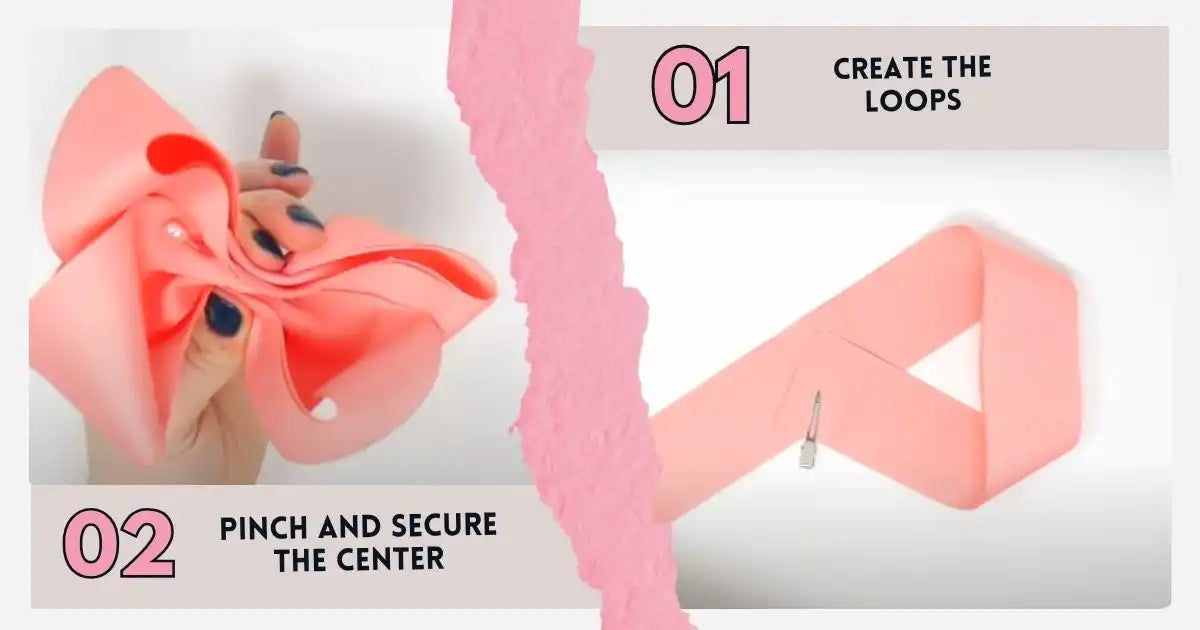
7. Add Bows for finishing touches

Adding bows is one of the easiest ways to make your tree look festive, polished, and full of charm. They bring a touch of elegance and help tie your entire ribbon design together for a cohesive look.

Here’s how you can place them effectively:

  • One large bow for the top
  • Medium bows places strategically around the tree
  • Small bows to fill empty spots

You can use pre-made bows or create your own bows. Always remember that consistency in bow size, spacing, and color keeps your tree looking coordinated and professionally styled.

8. Layer ribbon with ornaments and lights

Layering is the secret to achieving that rich, high-end look when decorating your Christmas tree with ribbon. It adds depth, texture, and a sense of balance that makes your tree stand out beautifully.

Try these layering ideas:

  • Pair wide statement ribbons with narrow accent ribbons for contrast
  • Use metallic ribbons to reflect the glow of your lights
  • Alternate textures like velvet, mesh, and satin for added dimension

As you decorate, step back periodically to check how the layers blend together, and ensure your tree looks balanced from every angle.

woman holding ribbon while decorating christmas tree

9. Customize and reuse

One of the best parts of decorating with ribbon is its versatility.

  • Change your ribbon colors each year for a new theme
  • Store ribbons rolled neatly to avoid creasing
  • Store bows flat inside boxes and label them

High-quality ribbons from BB Crafts can be reused for many holidays, making them a smart, sustainable choice.

5 Things to Avoid While Decorating Christmas Tree With Ribbon

Things to Avoid While Decorating Christmas Tree With Ribbon

1. Pulling the ribbon too tight

Wrapping the ribbon too tightly makes it look stiff, flat, and unnatural. A slightly loose drape creates soft curves that add movement and elegance to the tree. Allow the ribbon to flow so it blends naturally with the branches.

2. Uneven spacing

Inconsistent spacing can make the tree look cluttered in some areas and empty in others. Take a few steps back while decorating to check the overall balance from different angles. Adjust as you go to maintain a smooth, even ribbon flow from top to bottom.

3. Ignoring the inner branches

Focusing only on the outer branches can make your tree look flat and one-dimensional. Tucking some ribbon deeper inside adds depth and creates a fuller, layered appearance. It also helps your lights and ornaments stand out more beautifully.

4. Using too many ribbon styles

Mixing too many colors, widths, or textures can overwhelm your theme and make the tree look chaotic. Keep your choices to two or three complementary ribbons to maintain a cohesive design. This creates harmony and makes your decorations look well-planned and intentional.

5. Skipping the final fluff and adjustments

Once all the ribbon is placed, a few minutes of fine-tuning can make a huge difference. Fluff your loops, reshape your bows, and gently adjust any uneven sections. This final step gives your tree a polished, professional, photo-ready finish.

Fluffing bows and adjusting ribbons at the end is what makes your tree look polished and photo-ready.

Bring Your Christmas Tree to Life with Beautiful Ribbons

Don’t wait until the last minute to dress up your Christmas tree. The best holiday looks start with thoughtful details like ribbon. It’s one of the simplest ways to give your tree that “magazine-ready” finish without hiring a decorator.

With just a few ribbons, bows, and creative touches, your living room can turn into a cozy holiday centerpiece everyone will remember. So, grab your favorite ribbon rolls, try out a few of these tips, and make your tree shine this season.

Shop premium holiday ribbons, bows, and décor supplies at BBCrafts and bring your Christmas vision to life, before the season’s most popular designs sell out.

Decorating Christmas Tree With Ribbon FAQs

How do I use ribbon to decorate my Christmas tree?

Cut long strips of ribbon and weave them into the branches, letting them drape softly. Tuck the ends inside the tree so the ribbon looks natural and seamless. You can create loops, spirals, or cascading tails depending on the style you want.

How to decorate a Christmas tree with ribbon?

Start at the top and work your way down, placing the ribbon in loose loops or angled strips. Tuck each section into the branches to create depth and dimension. Adjust the spacing until the ribbon looks balanced from all sides.

Do you put ribbon on a Christmas tree first or last

Ribbons should go on after the lights but before the ornaments. This helps you shape and position the ribbon without knocking anything off. Once it’s in place, you can add ornaments to fill in the gaps.

How to make your Christmas tree look professional?

Choose a clear color palette, use ribbon to add texture, and mix ornaments in different shapes and sizes. Place larger items deeper inside the branches to create depth. Spread lights evenly so the tree glows from the inside out.

How to decorate a Christmas tree professionally with mesh ribbon?

Cut mesh ribbon into sections and tuck each piece into the branches to form full, airy poufs. Spread the poufs evenly around the tree to avoid heavy spots. Add ornaments and smaller accents around the mesh for a balanced, finished look.

How to put a ribbon around your Christmas tree?

Wrap the ribbon loosely in a spiral from the top to the bottom of the tree. Let it dip naturally between branches instead of pulling it tight. Tuck the ribbon in place as you go so it blends smoothly into the tree.

What is the correct order to decorate a Christmas tree?

Start with the lights, then add ribbon or garlands, and finish with ornaments and the tree topper. This order keeps everything neat and prevents decorations from getting pushed aside. It also helps the tree look structured and polished.

How to put two ribbons on a Christmas tree?

Select two ribbons that complement each other in color or texture, such as a wide base ribbon and a thinner accent ribbon. Layer or alternate them as you move around the tree. Tuck each one into the branches to create a rich, layered effect.

  •  

Best Wired Ribbon Craft Ideas for Every Occasion

It can be frustrating when ribbons lose their shape after all your effort in decorating. Wired ribbons solve the problem of edges that lose their form, holding their shape perfectly, making them ideal for bows, decorations, and DIY home décor.

If you’re searching for wired ribbon crafts ideas that bring elegance and character to Christmas décor, wedding accents, or your everyday crafts, these ribbons are the key to stunning results.

But how exactly can you use them to create something unforgettable?

What Makes Wired Ribbons Special for Craft Projects

What Makes Wired Ribbons Special for Craft Projects

Wired ribbons Wired Ribbons stand out for their thin, flexible wire stitched along the edges, giving them structure and stability that ordinary ribbons can’t match. Its hidden wire allows you to bend, twist, and shape it into creative designs that stay exactly how you want them.

Crafters value wired ribbons for their ability to hold beautiful bows, layered loops, and detailed accents without losing form. They bring a clean, polished look to every project, perfect for Christmas décor, wedding arrangements, and everyday crafts.

Because of its built-in flexibility, wired ribbon crafts look more refined and expressive, turning simple ideas into polished creations that stand out beautifully. 

Want to understand more about how wired ribbons work? Read our guide on what is wired ribbon to learn its structure and purpose.

7 Creative Wired Ribbon Craft Ideas For Every Occasion

Decorative bows and wired ribbon for christmas

1. Decorative Bows

Creating a wired ribbon bow is one of the most popular and rewarding uses for wired ribbon. Its flexible edges make it easy to shape perfect loops that hold beautifully in place. You can craft a simple, elegant bow or build a more detailed layered design. Wired ribbons give you complete control over the shape and fullness.

If you’ve ever wondered how to make a bow with wired ribbon, start by forming equal loops and twisting the center tightly before fanning them out. This allows the wire to maintain structure while giving your bow. For a more detailed guide on doing it, check out our blog ‘How to Make a Bow with Wired Ribbon’ for easy-to-follow steps. 

Use these bows to decorate gifts, wreaths, floral arrangements, or even home décor accents. With wired ribbons, your bows won’t lose shape, keeping every project looking crisp, balanced, and refined.

2. Holiday and Seasonal Decor

One creative wire ribbon crafts idea you can do is to use wired ribbons to decorate for the holidays, adding color and structure to your seasonal designs. Their flexible edges make them ideal for festive garlands, ornaments, and wreaths that hold their shape beautifully.

Use velvet or gold ribbons for Christmas decorations, orange and black designs for Halloween, or soft pastel tones for Easter to match each celebration. The built-in wire keeps every bow and loop neat and defined, ensuring your decorations stay picture-perfect throughout the season.

Wired ribbon for gift wrapping and house decoration

3. Home Decor Accents

Wired ribbons can instantly refresh your space with simple, elegant touches. Use them to decorate cushions, curtains, or lamp shades for a polished, coordinated look. These wire ribbon crafts are perfect for adding trim, creating decorative ties, or making custom ribbon flowers that match your interior style. 

Their flexible edges help you shape neat folds and curves that hold beautifully, giving your home décor a refined finish.

4. Gift Wrapping

One creative way to use wired ribbon for gift wrapping is to design layered bows or wrap the ribbon around boxes in unique patterns. You can mix different ribbon colors or textures to match the occasion. Metallic tones for Christmas, soft satin ribbon for weddings, or bright colors for birthdays. This will instantly make each gift for your loveones look thoughtful and beautifully crafted.

Wired ribbon for flower bouquet and scrapbook projects

5. Floral Arrangements

Floral designs become more captivating with wired ribbon crafts, which let you intertwine delicate textures and colors into each bouquet. Use wired ribbons to create intricate loops or cascading bows that complement the blooms, or wrap them gracefully around stems for a refined finish. 

These ribbons add a polished, expressive touch that turns every floral piece into a reimagined work of art, perfect for any home or special occasion.

6. Crafting Projects

Wired ribbon crafts open endless possibilities for creative projects like scrapbooking, handmade cards, or DIY jewelry. Use them to form textured borders, layered accents, or tiny ribbon rosettes that add charm and depth to your designs. 

Their flexibility allows you to shape and style them effortlessly, turning simple craft projects into standout pieces with personality and detail.

Wired ribbons for seasonal occasions and personalized gifts

7. Seasonal Wreaths

One of the most beautiful wired ribbon craft ideas is designing seasonal wreaths. Use wired ribbons to create elegant bows, flowing tails, or layered loops that add texture and character to your wreaths. 

You can match the ribbon colors and patterns to each season, use gold and red for Christmas, rustic tones for autumn, or pastels for spring to give every wreath a fresh and festive appeal.

8. Personalized Gifts

Another creative wired ribbon craft idea is using wired ribbons to personalize gifts. Shape them into names, initials, or decorative accents that make every present one-of-a-kind. Their moldable edges let you design custom touches that show thoughtfulness and creativity, turning even simple packages into memorable and heartfelt gifts.

When are the Perfect Moments to Use Wired Ribbon Accents?

When Are the Perfect Moments to Use Wired Ribbon Accents

1. Weddings

Material: Satin, organza, or sheer ribbons

Characteristics: Elegant and refined, these materials often come in soft neutrals or whites with a delicate sheen.

Uses: Ideal for floral arrangements, chair sashes, invitations, and favor boxes, giving wedding décor a timeless and romantic touch.

2. Christmas

Material: Velvet, burlap, or metallic ribbons

Characteristics: Rich textures and festive tones like gold, red, or green add warmth and sparkle.

Uses: Perfect for Christmas trees, garlands, wreaths, and gift wrapping that captures the holiday spirit.

3. Easter

Material: Pastel satin or grosgrain ribbons

Characteristics: Soft, lightweight, and cheerful, reflecting the freshness of spring.

Uses: Great for Easter baskets, floral wreaths, or adding delicate accents to seasonal crafts.

4. Halloween

Material: Satin, burlap, or patterned sheer ribbons

Characteristics: Bold colors like orange and black or spooky prints with webs or pumpkins set a festive tone.

Uses: Excellent for Halloween wreaths, themed garlands, or creative gift wrapping.

5. Birthdays

Material: Grosgrain or satin ribbons in bright hues

Characteristics: Playful and colorful, these ribbons bring energy and fun to any celebration.

Uses: Perfect for party decorations, balloon ties, or gift embellishments that stand out.

6. Baby Showers

Material: Soft satin or organza ribbons in pastel or neutral shades

Characteristics: Light, smooth, and delicate—ideal for welcoming a new baby.

Uses: Beautiful for decorating gifts, centerpieces, or party favors with a soft, charming look.

7. Anniversaries

Material: Satin, silk, or metallic ribbons

Characteristics: Luxurious and elegant, often in gold, silver, or deep jewel tones.

Uses: Suitable for wrapping anniversary gifts, decorating tables, or creating romantic floral accents.

8. Seasonal Décor

Material: Varies by season, burlap for autumn, satin for spring, or metallic for winter

Characteristics: Reflects each season’s mood through color and texture.

Uses: Great for wreaths, garlands, and home décor that showcase the beauty of every time of year.

What Makes Wired Ribbons Different from Regular Ribbons?

What Makes Wired Ribbons Different from Regular Ribbons

In wire ribbon crafts, the main feature that sets wired ribbons apart is the thin wire woven into their edges. This built-in support allows the ribbon to hold its shape, making it perfect for structured designs like bows, loops, and curls.

Regular ribbons, on the other hand, don’t have this wire, so they tend to drape or flow freely without maintaining form. While they’re ideal for soft, flowing decorations, wired ribbons give crafters more control and precision.

This flexibility and structure make wired ribbons a go-to material for creative projects that require lasting shape and detailed design.

Start Creating Beautiful Projects with Wired Ribbons Today

Wired ribbons are every crafter’s secret to designs that stand firm and look stunning. Their built-in wire makes shaping, bending, and styling easy, allowing you to craft with precision and creativity.

If you’re inspired to try these wired ribbon crafts, now’s the perfect time to get creative. Stock up on high-quality wired ribbons and start crafting decorations that look stunning for any season or celebration.

Browse our wired collection now and bring your ideas to life with ribbons that hold shape, style, and endless possibilities.

Wired Ribbon Crafts Frequently Asked Questions (FAQs)

What is a wired ribbon?

A wired ribbon is a type of ribbon with thin, flexible wires stitched along the edges. These wires help the ribbon hold its shape, making it easier to form bows and decorative accents. It’s widely used for crafts, gift wrapping, and seasonal décor.

What to use wired ribbon for?

Wired ribbon is used for creating bows, decorating gifts, and adding structure to craft projects. Its wired edges make it easy to shape, twist, and style for displays or home décor. People often use it for wreaths, holiday arrangements, and event decorations.

What types of ribbon are best for crafts?

Craft projects work well with ribbons like grosgrain, satin, organza, and wired ribbon. Each one handles differently, giving you options for structure, texture, or a soft look. Your choice depends on the style and durability you need for the project.

Can I use wired ribbon to make flowers?

Yes, wired ribbon is great for making flowers because the edges hold their shape. You can bend and curve the petals easily without losing form. It creates fuller, more defined floral designs.

How to make a bow with wired ribbon?

Start by forming loops and holding them firmly in the center. Pinch the middle, twist the ribbon if needed, and secure it with wire, a twist tie, or a ribbon tail. Shape the loops after securing to get a neat, full bow.

What can you make out of ribbon?

Ribbon can be used to create bows, flowers, bookmarks, and hair accessories. It also works for home décor accents, gift wrapping, and craft embellishments. Different textures and widths let you produce a wide range of creative pieces.

Is wired ribbon reusable?

Yes, wired ribbon is reusable as long as it’s not creased or damaged. The embedded wires help it keep its shape even after multiple uses. Just smooth it out and reshape it before using it again.

  •  

How to Use a Ribbon for Gift Wrapping?

What if the secret to making your gifts look store-bought perfect was already sitting in your drawer? We’ve all been there—staring at a wrapped box that feels like it’s missing something. That “something” is often a simple ribbon. But not just slapped on—it’s how you use it that makes all the difference. Think it’s just tying a bow? Not quite.

So, how do you use ribbon for gift wrapping?

You measure, wrap, tie, and finish with creative touches that match the occasion.

But hold on—we’re not jumping ahead just yet. There’s more to it than you think, and a few clever tricks can make your wrapping stand out every time.

Ribbon Techniques to Make Gifts Stand Out

Ribbons can turn the simplest wrapping paper into a thoughtful, polished gift. A ribbon adds charm and a personal touch if you're wrapping for birthdays, holidays, or special occasions.

Choose the Right Ribbon and Measure and Cut the Ribbon

1. Choose the Right Ribbon

Before you begin, select a ribbon that complements your wrapping paper and the occasion. Here are some common types:

  • Satin Ribbon Smooth and shiny, great for elegant gifts.
  • Grosgrain Ribbon Textured and sturdy, ideal for structured bows.
  • Organza Ribbon Sheer and delicate, perfect for weddings or baby showers.
  • Curling Ribbon Budget-friendly and fun for casual occasions.

Tip: Make sure the ribbon width matches the size of your package. Narrow ribbons work well for small boxes, while wide ribbons suit larger gifts.

2. Measure and Cut the Ribbon

Wrap the ribbon around your box to measure how much you need. A good rule of thumb is to leave extra length for tying bows or knots—usually about 5–8 inches extra on each end.

Steps:

  1. Wrap the ribbon around the box once or twice, depending on the style.
  2. Add enough slack to tie a bow.
  3. Cut with sharp scissors to prevent fraying.
Wrap the Ribbon Around the Gift and Tie the Perfect Bow

3. Wrap the Ribbon Around the Gift

There are a few ways to wrap ribbon, but here’s a classic method:

The Cross Wrap:

  1. Place the gift box face-down on the ribbon.
  2. Bring the ribbon ends up and cross them over the top.
  3. Flip the box and bring the ribbon ends to the opposite sides.
  4. Tie the ribbon where the lines intersect in the center.

This creates a simple, clean, crisscrossed look.

4. Tie the Perfect Bow

A well-tied bow makes the gift stand out. Here’s how:

  1. Cross the ribbon ends and make a basic knot.
  2. Create two loops (bunny ears).
  3. Tie the loops together like you would shoelaces.
  4. Adjust the loops and tails until even.

Optional:  Use double-sided ribbon for a more polished finish.

Add Personal Touches

5. Add Personal Touches

If you want to go beyond the basics, here are a few creative ideas:

  • Layered Ribbons: Use two ribbons of different widths or colors together.
  • Add a Tag: Thread a gift tag through the ribbon for personalization.
  • Include Extras: Add small ornaments, dried flowers, or pine sprigs for decoration.
  • Use Curling Ribbon: Run scissors along the ribbon to make spirals.

3 Cool Ways to Use Ribbon on a Present

3 Cool Ways to Use Ribbon on a Present

When it comes to gift wrap decorations, ribbon is your secret weapon. It adds personality, polish, and that "wow" factor to even the simplest wrapping. If you’re looking for different ways to use ribbon on a present, here are three timeless styles—plus a few tips on how to mix them up with small bows for presents, layered looks, and cool present wrapping ideas.

Horizontal Bow

If you're short on time but still want your gift to look polished, the Horizontal Bow is a solid choice. Just wrap the ribbon once around the box and tie a bow at the center—simple, fast, and neat. It's perfect for small bows for presents, especially when you’re wrapping in bulk or putting together last-minute gifts.

Mix and match these ribbon techniques with layered textures, curled ends, or personalized tags. If you're using gift wrap ribbons for holidays or birthdays, trying these styles will instantly upgrade your presentation.

Tiffany Bow

The Tiffany Bow is a timeless favorite, often recognized from the famous light blue Tiffany & Co. boxes tied with crisp white ribbon. It’s elegant, clean, and works for nearly any occasion—from weddings to birthdays. 

Use a double-sided gift wrap ribbon, since both sides will show once it's wrapped around the box. Its symmetrical loops and neat cross-wrap design add a high-end finish to your gift. If you're aiming for that store-bought perfection, this bow is hard to beat.

Diagonal Bow

For something a bit more modern, the Diagonal Bow wraps across the corners of your gift box, creating a striking X-shaped look. 

This style is perfect when you want your ribbon on presents to stand out. It gives your wrapping a dynamic feel without being complicated. Ideal for both kids’ gifts and more formal events, it’s a great way to add variety to your gift wrap decorations.

Wrap It Like You Mean It

Gift wrapping isn't just about hiding what's inside—it's about showing you care. A ribbon isn’t just decoration. It’s the finishing touch that turns “I bought this” into “I made this special.” So why settle for plain when you can wrap like a pro?

Use ribbons to tell a story—try a diagonal wrap, layer two textures, or curl the ends for fun. These little touches stick in people’s minds. And guess what? You don’t need to be a DIY genius. You just need the right ribbon.

BBcrafts has you covered with wholesale ribbons—satin, grosgrain, organza, velvet, and more—perfect for holidays, birthdays, or “just because” gifts. Whether it’s a small bow or a bold statement, you’ll find a style that fits.

So go ahead—open that drawer, grab your ribbon, and make someone’s day. Because the right wrap doesn’t just hold a gift—it holds meaning.

Key Takeaways

Ribbon Adds the Wow Factor

A ribbon can instantly upgrade plain paper into eye-catching gift wrap decorations. From satin to grosgrain, picking the right ribbon style and size helps set the mood for your gift.

There Are Many Ways to Style It

Explore different ways to use ribbon on a present—horizontal bows, diagonal wraps, and layered ribbons all add character. Use small bows for presents or mix colors for truly cool present wrapping.

Finishing Touches Matter

Adding gift tags, curled ends, or extra details makes your ribbon on presents more personal. With high-quality gift wrap ribbons from BBcrafts, you can create thoughtful wrapping that feels just as meaningful as the gift inside.

  •  

What are the Types of Organza Ribbon?

The main types of organza ribbon are silk, polyester, nylon, embroidered, and crushed or textured. Each type varies in feel and finish, from soft and sheer to crisp, decorative, or dimensional.

Limited color or width options can kill creativity, especially on custom packaging or event décor. According to a recent Statista report, over 65% of crafters indicate that having a wide range of product choices would make them more likely to buy. Why settle for restrictions when your designs deserve full creative freedom?

Silk Organza Ribbon

Silk Organza Ribbon

Silk organza ribbon is made from soft organza material that comes directly from high-grade silk fibers. Known for its fine texture and natural sheen, it has a luxurious feel and drapes smoothly. 

This type of ribbon is lightweight, breathable, and holds its shape well, making it ideal for high-end packaging, wedding décor, or fashion design. As a form of organza fabric, silk organza offers an elegant finish that synthetic versions can't fully replicate.

Key Features:

  • Made from 100% silk
  • Soft, sheer, and breathable
  • Naturally glossy finish
  • Ideal for luxury design and décor

Polyester Organza Ribbon

Polyester Organza Ribbon

Polyester organza ribbon is the most common version of organza fabric material used today. It's stiffer than silk but more affordable and durable. 

This synthetic option holds folds and shapes well, which makes it perfect for structured bows, event styling, and everyday crafts. Although it's less soft than silk organza, polyester organza still delivers a translucent look and crisp feel.

Best Uses:

  1. Bows and structured decorations
  2. Budget-friendly packaging
  3. Craft and floral work
  4. General event styling

Nylon Organza Ribbon

Nylon Organza Ribbon

Nylon organza ribbon is a lightweight and flexible version of organza fabric. It shares a similar sheer appearance with silk and polyester but offers a bit more stretch and resistance to fraying. 

While it’s not as common, nylon organza is useful in applications where a bit more give is needed, such as in garment trims or soft decorative accents. It bridges the gap between durability and the delicate look of soft organza.

Quick Facts:

  • Lightweight with slight stretch
  • Sheer like silk, but stronger
  • Suitable for clothing, trims, and soft crafts
  • Holds color well

Embroidered Organza Ribbon

Embroidered Organza Ribbon

Embroidered organza ribbon features decorative stitching or embellishments on a base of organza fabric material. 

This type often includes floral patterns, metallic threads, or beadwork, adding texture and visual interest. It’s commonly used for gift wrap, luxury invitations, or special-occasion accessories. The base is usually a soft organza material, making it both elegant and slightly stiff enough to hold form.

Common Embroidery Styles:

  • Floral threadwork
  • Metallic or satin stitching
  • Sequins or bead accents
  • Seasonal or themed motifs

Crushed or Textured Organza Ribbon

Crushed or Textured Organza Ribbon

Crushed or textured organza ribbon adds a unique feel and visual depth. Instead of the usual flat finish, this ribbon has a wrinkled or pleated surface. Made from silk, polyester, or blends, it still uses the base properties of organza fabric but delivers a more artistic, tactile look. 

This style works well in event design, floral arrangements, and layered craft projects where dimension matters. Despite its texture, it still retains the lightweight nature of soft organza.

Why Use It:

  • Adds visual movement and texture
  • Breaks monotony in flat designs
  • Pairs well with layered or mixed-material projects
  • Feels artisanal or handmade

Organza Ribbon Type Comparison Table

This table gives a quick side-by-side view of the most common types of organza ribbon. Each row highlights how the material and texture shape its best uses, especially in projects that need the look and feel of soft organza.

Ribbon Type

Material Used

Texture & Feel

Best For

Soft Organza?

Silk Organza

100% Silk

Sheer, soft, and glossy

Luxury décor, formal wear, upscale packaging

Yes

Polyester Organza

Synthetic (Polyester)

Crisp, stiff, semi-sheer

Event styling, bows, cost-effective gift wrapping

No 

Nylon Organza

Synthetic (Nylon)

Light, flexible, slightly stretchy

Garment trims, soft accents, lightweight crafts

Yes

Embroidered Organza

Silk or Polyester base

Decorative, textured, layered

Invitations, specialty gift wrap, embellishments

Yes

Crushed/Textured Organza

Silk, Polyester, or blends

Wrinkled, tactile, dimensional

Floral work, artistic layouts, layered designs

Yes

Don’t Cut Corners on Creative Work

When you settle for fewer choices, your designs end up doing the same. With so many ways to use shiny organza fabric—from wedding favors to holiday wreaths—why limit your creativity? There are endless types of organza ribbon to explore, each bringing its own look and texture to the table. BBcrafts offers more than fabric organza in every shade and finish. You’ll find satin ribbon, wired ribbon, and wreath supplies that match your project from start to finish. Every ribbon tells a story. Choose one that fits yours.

Thinking twice before you buy could be the difference between “good enough” and “that looks amazing.” In the world of organza fashion, details aren’t extra—they’re everything. So if your current supplier leaves you tying loose ends, it’s time to switch.

Shop BBcrafts today and give your ideas room to grow.

FAQs

What is organza fabric used for?

Organza fabric is commonly used in fashion, décor, and crafts. It’s ideal for gowns, gift wrapping, ribbons, and decorative accents because of its sheer and structured look.

What makes organza fabric material different from other fabrics?

Organza fabric material is lightweight, semi-transparent, and holds its shape well. It offers a crisp texture that’s perfect for layering and volume.

Is soft organza material better for clothing?

Yes. Soft organza material works well for garments like skirts, blouses, and overlays where comfort and flow are important without losing the signature organza look.

What gives shiny organza fabric its appearance?

Shiny organza fabric gets its sheen from the type of fibers used, such as silk or polyester. It’s often chosen for formalwear, event styling, and statement pieces in organza fashion.


  •  

How To Make Grosgrain Ribbon Bows

I once spent hours trying to wrap the perfect gift for my niece’s birthday. The paper was smooth, the colors matched her style—but something still felt off. It was the bow. No matter how many times I tied it, fluffed it, or adjusted it, it just wouldn’t sit right. I tried satin, wired, even curling ribbon, but none gave me that crisp, polished look I had in mind.

That night, I stumbled across something I hadn’t considered before—a specific kind of ribbon that not only looked elegant but also held its shape beautifully.

But what if the secret to stunning gifts, stylish crafts, and eye-catching décor came down to the way you tie a single ribbon?

What Is a Grosgrain Ribbon Made Of?

The word "grosgrain" describes the ribbon’s weave, not the material it's made from. While it was originally made from natural fibers like silk or wool, modern grosgrain ribbon is usually made from synthetic materials such as polyester or rayon. At BBcrafts, our grosgrain ribbon is made from 100% polyester, offering excellent strength, flexibility, and value.

5-Step DIY Grosgrain Ribbon Bows

Learn how to make a grosgrain ribbon bow in 5 easy steps. This guide works well with plain or custom printed ribbon for gifts, crafts, or hair clips.

Materials You Will Need

Before starting, gather the following materials:

  • Wide grosgrain ribbon (2.25 inches wide) Use a ribbon that is long enough to make four loops and have two tails. This tutorial works well with custom printed grosgrain ribbon or plain styles.
  • Scissors For cutting the ribbon and trimming the ends neatly.
  • Thread or thin wire To tie the center of the bow securely.
  • Hot glue gun (optional)For attaching the center wrap or decorations.
  • Small piece of ribbon for the center This will cover the tied part and give a polished look.
  • Embellishments (optional) Such as rhinestones or buttons for decoration.

If you work with large quantities, you can use wholesale grosgrain ribbon by the roll for convenience and better value.

Step-by-Step Instructions

Create the Loops and Pinch and Secure the Center

1. Create the Loops

Begin by folding your grosgrain ribbon back and forth to form a bow shape:

  • Make four equal loops – two on each side.
  • Let the ribbon ends (the tails) hang down below the loops.
  • Make sure all loops are even to keep the grosgrain ribbon bow symmetrical and neat.

2. Pinch and Secure the Center

Next, form the basic shape of the bow:

  • Pinch the ribbon in the center so it creates an accordion shape.
  • Tie a piece of strong thread or thin wire around the center to hold the shape tightly.
  • Pull the thread firmly but carefully to avoid breaking it.
Shape and Adjust the Bow and Finish the Center of the Bow

3. Shape and Adjust the Bow

Once the bow is secured:

  • Fluff out the loops gently to give the bow a rounded and full appearance.
  • Adjust the loops and tails until they are evenly arranged.
  • This step is important to get the professional look typical of a grosgrain ribbon bow.

4. Finish the Center of the Bow

To give the bow a clean finish:

  • Cut a small piece of ribbon and wrap it around the center to cover the thread or wire.
  • Use hot glue to secure it at the back.
  • You may also add an embellishment like a button or jewel to the center, especially when using custom printed grosgrain ribbon for extra style.
Trim and Seal the Ribbon Tails

5. Trim and Seal the Ribbon Tails

To complete the bow:

  • Trim the tails to your preferred length.
  • Cut the ends straight, angled, or in a “V” shape for a polished finish.
  • Use heat or a fray-stopping product to seal the ends and prevent unraveling.

Additional Tips

  • This method works with any wide grosgrain ribbon, including printed or plain varieties.
  • You can use wholesale grosgrain ribbon by the roll if you're making bows in bulk for retail, events, or gift packaging.
  • Practicing a few times will help you get consistent, professional results.
  • These bows are perfect for hair accessories, gift wrapping, clothing embellishments, and craft projects.

What Is Grosgrain Ribbon Used For?

Grosgrain ribbon is known for its strong texture and clean appearance, making it useful for many types of projects. It’s commonly used in sewing, crafts, and home décor, and works well with both plain and custom printed grosgrain ribbon. Below are some of the most popular uses:

What Is Grosgrain Ribbon Used For?

Sewing and Clothing Projects

Grosgrain ribbon is often used in sewing to add trim or facing to clothing. It can be stitched directly onto fabric, making it ideal for finishing hems on skirts, dresses, sleeves, and necklines. A wide grosgrain ribbon offers a clean, matte look and is often used in formal wear, such as tuxedo trousers, as an alternative to satin trim. For tuxedo braid, a 7/8" black grosgrain ribbon is a standard choice.

In hat making, also known as millinery, grosgrain ribbon is used to make hat bands, bows, and other decorative shapes for hats and fascinators.

Crafting and Accessories

Grosgrain ribbon is popular in crafting because it holds its shape well and is easy to use. It’s perfect for both flat and shaped decorations. One of the most common uses is making a grosgrain ribbon bow, which is ideal for hair clips, hats, gift wrapping, and more.

Its strength also makes it useful in bookbinding to reinforce spines. You can use custom printed grosgrain ribbon to add a personal touch to projects like greeting cards, scrapbooks, bookmarks, and wall decorations.

Home Décor

In home décor, grosgrain ribbon can be used as a trim or accent. A wide grosgrain ribbon works well for edging table runners, curtains, pillows, or placemats. It can also be used to create curtain ties, napkin rings, or even decorative lampshades. Some even use it to trim upholstered furniture for a finished look.

Where Crafting Ends, BBcrafts Begins

The right ribbon doesn’t just hold things together—it tells a story. A flat, floppy bow can ruin the look of a gift or craft, but a crisp grosgrain ribbon bow adds that wow factor. It’s the kind of detail people notice, even if they don’t say it out loud.

At BBcrafts, we know ribbon matters. That’s why we offer high-quality grosgrain ribbon, including custom printed grosgrain ribbon, wide grosgrain ribbon, and wholesale grosgrain ribbon by the roll. Whether you're creating bows for gifts, hair accessories, or event décor, our ribbons are made to hold their shape and stand out.

So next time you reach for just any ribbon—stop. Choose one that works as hard as you do. BBcrafts ribbon isn’t just a supply; it’s the finishing touch that brings your entire project together.

Craft bold. Wrap smart. Tie with BBcrafts.

Key Takeaways

The Right Ribbon Makes All the Difference

A crisp, polished grosgrain ribbon bow can instantly upgrade your gift wrapping, crafts, or decorations. Unlike flimsy alternatives, grosgrain holds its shape beautifully and looks professional every time.

It’s Easier Than You Think

With just five steps and a few basic tools, anyone can create bows that look store-bought. Whether you're using custom printed grosgrain ribbon or plain styles, this method works for all skill levels.

Stock Up the Smart Way with BBcrafts

For big projects or regular crafting, using wide grosgrain ribbon or buying wholesale grosgrain ribbon by the roll from BBcrafts saves money and ensures you always have the perfect ribbon on hand.

  •  

How to Make DIY Ribbon Wands for Parties and Fun Events

Great party decor can still fall flat when it only sits in the background. Streamers, balloons, and table settings look nice, yet they rarely get guests involved or keep energy going once the music starts. That’s where DIY ribbon wands change everything.

DIY ribbon wands add movement, color, and interaction to any space using simple materials and a few easy steps. With flowing wand ribbon and playful ribbon sticks, guests start moving, playing, and engaging without being told what to do. They work equally well for parties, classrooms, and special events.

Once you learn how to make DIY ribbon wands, you’ll see how a simple craft can completely change the feel of a celebration. Mastering the process opens up endless ways to add movement, color, and hands-on fun to any event.

Why Ribbon Wands are the Ultimate Party Accessory

Why Ribbon Wands Are the Ultimate Party Accessory

When you want a party detail that actually gets people moving, ribbon wands are hard to beat. DIY ribbon wands are not just decorations they're something your guests can play with, wave around, and enjoy together. 

Using a wand ribbon or colorful ribbon sticks can make a simple party feel magical in seconds. The great thing is that you don’t need special skills or a big budget to make them, which makes them perfect for last-minute planning. 

Ribbon wands add more fun

Ribbon wands give a pure visual joy. The moment they start moving, they instantly transform the atmosphere of a room. As ribbons swirl, twirl, and dance through the air, they create an eye-catching effect that feels festive and playful. They encourage guests to move, interact, and enjoy the moment, no instructions required.

Perfect for kids and adults

One of the best things about ribbon wands is that they’re truly ageless. Kids love waving them during games and dances, while adults enjoy using them for photo moments, celebrations, and even stress-free movement activities. 

They’re simple enough for children to make, yet customizable enough for grown-up events. Using stick ribbon makes them easy to hold and twirl for everyone.

Great for photos, dancing, and party favors

Ribbon wands double as decor and entertainment. They look fantastic in photos, add flair to dancing, and make wonderful party favors guests can take home. Unlike disposable decorations, ribbon wands are interactive and reusable, which makes them even more appealing. Your ribbon sticks will get plenty of use at games, parades, and photo sessions.

What are the Best Occasions to Use DIY Ribbon Wands

DIY ribbon wands work in more places than most people expect. They bring motion, color, and energy into moments that benefit from participation and visual interest.

Occasion

How ribbon wands elevate the experience

Birthday parties

Kids use them during games, free play, and dance moments, which keeps energy high without added setup

Baby showers

Light ribbons in soft tones add a gentle visual touch that feels warm and celebratory

Weddings and send-offs

Guests wave them during exits, aisle moments, or photo sessions as a clean alternative to sparklers

Holiday events

Ribbon colors can match seasonal themes and decorations with minimal effort

Classroom celebrations

Teachers use them during movement breaks, rewards, or interactive lessons to keep attention engaged

Ribbon wands adapt easily to the mood and scale of an event, from quiet gatherings to high-energy celebrations. When you want something simple that adds movement and interaction, DIY ribbon wands fit naturally into the moment.

6 Easy Steps on How to Make DIY Ribbon Wands

Making DIY ribbon wands is simple, relaxing, and surprisingly satisfying. With a few supplies and a little creativity, you can create ribbon sticks that look festive and feel great to use. Follow these steps to learn how to make ribbon wands that work for parties, classrooms, and special events.

6 Easy Steps on How to Make DIY Ribbon Wands prepare and gather ribbon wand materials

1. Prepare your materials

Start by preparing your ribbons and workspace, so the process stays smooth from beginning to end. Cut your wand ribbon into lengths that suit your audience. Shorter ribbons work better for younger kids since they are easier to control, while longer strands create flowing movement that looks great in photos and dancing. 

Choose colors that match your event theme or mix shades for a playful look. Using quality ribbon makes a visible difference, especially when the wands are in motion. Satin ribbon offers a soft shine, while organza ribbon adds lightness and texture. Laying everything out before you begin helps you move quickly and keeps crafting stress-free.

2. Gather your basic supplies

One reason DIY ribbon wands are so popular is how little you need to get started. A simple setup makes this craft ideal for group activities, classrooms, or last-minute party prep. 

Materials you needed:

  • wooden dowels or pre-made ribbon sticks
  • scissors
  • several types of ribbon in different widths. 

Mixing textures gives your stick ribbon more visual interest when it moves. Satin ribbon works well for smooth flow, while wired ribbon holds shape beautifully. You can explore options like satin ribbon and wire ribbon to create ribbon wands that look polished without feeling complicated.

6 Easy Steps on How to Make DIY Ribbon Wands add additonal decor and attach ribbon to wand

3. Add optional decorations

This step lets you turn simple ribbon sticks into something personal. Optional decorations allow you to adjust the look based on the event or age group. Washi tape creates quick patterns on the handle, while glitter tape adds sparkle that catches the light. Beads introduce sound and texture, which kids especially enjoy. Tulle or streamers can add volume and softness to the wand ribbon without adding weight. 

Organza ribbon is another great choice if you want an airy, elegant effect. You can find lightweight options like organza ribbons that blend easily with satin or wired ribbon for a layered finish.

4. Attach ribbons to the wand

Gather several ribbon strands and secure them to one end of the dowel or stick. You can tie the ribbons directly onto the stick using tight double knots or tape them firmly in place for a cleaner look. Make sure everything feels secure before moving on, especially if the ribbon wands will be used for dancing or games. 

This step moves quickly, which makes it perfect for party craft stations. Once attached, test the movement by gently twirling the wand. A well-balanced bundle of wand ribbon creates smooth motion and prevents tangling during play.

6 Easy Steps on How to Make DIY Ribbon Wands finish and add personalize ribbon wand label

5. Finish with safety and smart storage

Before handing out your DIY ribbon wands, take a moment to check for safety and comfort. Smooth out rough edges on sticks and avoid ribbons that are too long for small children. Use non-toxic materials and lightweight decorations so the ribbon sticks stay easy to handle. For cleanup, store finished wands upright in jars or bins to prevent creasing. 

Bundling them with soft ties keeps ribbons neat and ready for reuse. Proper storage means your ribbon wands can come back out for future parties, classroom activities, or creative play without extra work.

6. Personalize and label your ribbon wands

Once your DIY ribbon wands are finished and stored, take a moment to add personal touches that make them feel special. Writing names on the handle with a paint pen helps kids keep track of their own ribbon sticks during parties or classroom activities. Stickers, tags, or small charms tied near the base of the wand ribbon add personality without affecting movement.

This step works especially well for party favors and group events. Personalized ribbon wands feel intentional, encourage guests to take them home, and extend the life of your craft beyond a single celebration. It’s a simple way to elevate how to make ribbon wands feel thoughtful and memorable without adding extra complexity.

Fun Ways to Use Your Ribbon Wands

Fun Ways to Use Your Ribbon Wands

Once your DIY ribbon wands are ready, they become more than crafts. They turn into tools for movement, play, and shared moments. From parties to classrooms, ribbon sticks add color and motion that invite people to join in without instructions.

Party games

Ribbon sticks work perfectly in active games because they encourage movement without competition pressure. During a ribbon parade, kids and adults move together to music while waving wand ribbon through the air. Freeze dance adds excitement as players stop mid-twirl, while relay ribbon races turn simple team games into lively group fun.

Photo booth props

DIY ribbon wands create movement that makes photos feel alive. When guests wave stick ribbon during photos, the flowing motion adds color, texture, and energy that static props cannot create. They work well for birthday backdrops, wedding photo areas, and casual social media shots that feel spontaneous and joyful.

Classroom and learning activities

Teachers use ribbon wands to support learning through movement. Wand ribbon helps during short activity breaks, rhythm exercises, and music lessons. Ribbon sticks also work as visual rewards, encouraging participation and focus while keeping the environment calm and engaging for students of all ages.

For larger groups, classrooms, or event planning, buying wholesale ribbon helps you save on costs while creating consistent, high-quality ribbon wands in bulk.

Show Off Your DIY Ribbon Wands with BBCrafts

DIY ribbon wands demonstrate how a simple craft can transform into something truly memorable. With a few well-chosen ribbons and a bit of creativity, you end up with ribbon sticks that add movement, color, and personality to any celebration. They bring people together, spark play, and make ordinary moments feel more alive.

If you’ve made your own wand ribbon, now’s the perfect time to take it further. Create ribbon wands that stand out using high-quality satin and organza ribbons from BBCrafts. The right materials make a visible difference in movement, color, and finish. Start your next project with ribbons designed to look great and last through every celebration.


  •  

4 Creative Winter Decorations for Weddings You’ll Love

Planning a winter wedding can feel overwhelming. With so many options for winter decorations for weddings, you could end up missing the perfect details that make your celebration truly magical. 

However, with the right approach, you can confidently choose winter wedding decorations that will create a space that guests will remember. So, how do you know which pieces will bring warmth, elegance, and charm and which ones could make your celebration fall flat?

Why Winter Weddings Feel Extra Magical

Why Winter Weddings Feel Extra Magical

Winter naturally sets the stage for a wedding that feels intimate, cozy, and romantic. The season’s unique atmosphere creates moments your guests will never forget. From the moment they arrive, everything feels a little more enchanting:

  • Soft, early evening light that casts a gentle glow over your venue

  • Cool, crisp air that contrasts beautifully with warm décor and cozy touches

  • Quiet, peaceful surroundings that make every moment feel more personal and special

Since the sun sets earlier, candles, lanterns, and fairy lights stand out even more, filling the space with a dreamy, magical glow. Layered lighting and seasonal accents amplify the warmth, making your winter wedding feel both elegant and inviting.

Best  Decoration Styles for Weddings during Winter Season

Winter weddings create a unique atmosphere filled with warmth, elegance, and seasonal charm. With the right winter decorations for weddings, your venue can feel romantic, inviting, and visually unforgettable. From soft winter whites to rich jewel tones, the season allows you to design a setting that reflects both style and comfort.

Winter Wonderland Elegance

A winter wonderland theme focuses on soft textures and icy details that feel calm and refined. This look works especially well in indoor venues or evening ceremonies where lighting plays a major role.

White, icy blue, and silver tones create a clean base, while floral sprays and picks help build frosted centerpieces and aisle accents. Decorative ribbons in sheer or satin finishes can be tied around chairs, napkins, or vases for subtle sparkle. 

To complete the look, winter accent signs and soft lighting add a magical glow without overpowering the space. Together, these details create winter decorations for wedding settings that feel timeless and romantic.

Cozy Rustic Cabin Charm

For couples who want a warm and intimate celebration, a rustic cabin theme brings comfort into winter décor. Natural textures and earthy tones make guests feel relaxed and welcomed.

Wood accents pair beautifully with evergreen-inspired floral sprays and picks used in centerpieces and table arrangements. Soft lighting from lanterns or candles enhances the cozy feel, while layered fabrics like tulle fabric can be used for table runners or backdrops. Adding seasonal ribbons in neutral or plaid-inspired tones helps tie the décor together and reinforces the rustic charm. This style of winter decorations for wedding venues works well for both indoor and countryside settings.

Glam Metallic Winter Style

A metallic winter theme is ideal for couples who want their wedding to feel elegant and luxurious. Reflective accents and shimmering details enhance the space while still embracing the winter season.

Gold, silver, and rose gold ribbons can be used to dress up bouquets, chairs, and table settings. Pair them with statement accent signs and mirrored décor to reflect light throughout the venue. When balanced with neutral fabrics and soft florals, metallic details bring sophistication and glow to winter decorations for wedding receptions.

Jewel-Toned Winter Luxury

Jewel-toned décor adds depth and drama to winter weddings while maintaining a refined appearance. Rich shades like emerald, burgundy, plum, and navy pair beautifully with winter greenery and metallic finishes.

Layering textured linens or table covers from tablecloths and runners creates a strong foundation for the design. Deep-colored arrangements using seasonal floral sprays and picks add richness, while subtle metallic or satin ribbons complete the look. This approach to winter decorations for wedding styling feels bold, elegant, and perfectly suited for the season.

How to Choose the Right Color Palette for Winter Wedding Decor?

Your color palette sets the foundation for your entire wedding design, influencing everything from florals to lighting and table décor. Choosing the right tones helps your winter decorations for wedding themes feel cohesive and well balanced.

Color Palette

Mood / Vibe

Tips / Notes

White + Silver

Icy, elegant, and classic

Ideal for frosted or winter wonderland themes; works best with cool lighting.

Emerald or Navy

Bold, dramatic, and luxurious

Adds richness and depth; pairs well with gold accents and jewel-toned florals.

Brown, Green, Ivory

Warm, rustic, and cozy

Perfect for cabin or woodland themes; highlights natural textures and greenery.

Selecting a clear color direction makes decorating decisions easier and keeps your styling consistent throughout the venue. When your palette is intentional, winter decorations for wedding celebrations feel polished, connected, and visually striking.

4 Essential Winter Decorations for Wedding Themes

Once you have chosen your theme, the right details help bring everything together. Thoughtfully chosen winter wedding decoration ideas add warmth, texture, and seasonal beauty, making your venue feel inviting and intentional.

1. Winter Florals and Greenery

Winter offers stunning floral options that feel elegant and seasonal at the same time. Flowers like amaryllis, ranunculus, and anemones add softness and romance, while evergreens bring structure and fullness to your arrangements. These seasonal choices help create beautiful winter wedding flower arrangements that guests will remember.

You can enhance your floral designs by mixing in berries, pinecones, and frosted leaves using floral sprays and picks. These elements help your arrangements feel rich and layered, making them ideal for winter decorations for wedding ceremonies and receptions alike.

2. Lighting to Create a Warm and Romantic Glow

Lighting is one of the most important winter decorations for wedding styling, especially since the season naturally leans toward darker evenings. A mix of candles, lanterns, fairy lights, and decorative LED trees creates a soft glow that feels cozy and romantic.

Pairing tall candlesticks with smaller votives adds depth to your tables, while reflective accents help spread light throughout the room. Decorative accent signs with winter or romantic messages can also enhance the atmosphere while doubling as functional décor. When layered properly, lighting transforms your venue into a warm and magical winter setting.

3. Textiles and Cozy Details

Textures play a major role in making winter weddings feel comfortable and welcoming. Guests immediately notice details like velvet tablecloths, soft napkins, and cozy seating areas. Faux-fur throws or warm fabric accents are especially appreciated during colder months.

You can soften your space with flowing tulle fabric for table overlays, backdrops, or ceremony décor. Adding coordinating ribbons to chairs, napkins, or centerpieces helps tie everything together. These layered textures enhance winter decorations for wedding venues by making the space feel warm without sacrificing style. However, these themes may require a longer set of textiles and ribbons, so buying wholesale ribbons online can help you save more.

4. Centerpieces and Table Styling

Your reception tables are one of the first things guests focus on, so they deserve special attention. Winter centerpieces often feature evergreen runners, frosted branches, lanterns, winter berries, or glass cloches filled with fairy lights, making them perfect winter centerpieces for a wedding.

Using seasonal greenery from floral sprays and picks allows you to create flexible designs that work for both rustic and elegant themes. These ideas are perfect for winter wedding reception centerpieces and can be easily mixed and matched to suit

your vision. Well-styled tables complete the look and anchor all your winter decorations for wedding celebrations.

Get Stunning Winter Decorations for Wedding Today

Creating your dream winter wedding is all about the details, and the right winter decorations for a wedding can turn your vision into a magical reality. From cozy textures and sparkling lights to elegant centerpieces and seasonal florals, every element adds warmth, charm, and seasonal beauty to your celebration.

Mix styles, colors, and lighting that reflect your personality and theme, and make your venue feel unforgettable. Get stunning winter decorations for weddings today at BBcrafts

Winter Decorations for Weddings FAQs

How do you decorate for a winter wedding?

Decorate for a winter wedding by focusing on warm lighting, seasonal florals, and layered textures. Candles, lanterns, and fairy lights help create a cozy atmosphere. Add winter greenery, ribbons, and soft fabrics to balance elegance with comfort.

What color is best for winter weddings?

Classic winter wedding colors include white, ivory, silver, and deep jewel tones. These shades feel clean, elegant, and seasonally appropriate. Adding metallic accents helps reflect light and keeps the décor from feeling too dark.

How to style for a winter wedding?

Start with a clear theme, such as winter wonderland, rustic, or metallic glam. Use coordinated florals, textiles, and lighting to support that style across the venue. Consistent colors and materials help winter decorations for wedding settings feel polished and intentional.

What are good winter wedding favors?

Winter wedding favors should feel cozy and useful for the season. Popular options include candles, hot cocoa kits, mini blankets, or seasonal treats. Personalized packaging helps the favors feel thoughtful and memorable.

What are some inexpensive centerpiece ideas?

Affordable winter centerpieces include greenery runners, candles in glass holders, or lanterns with fairy lights. Pinecones, berries, and frosted branches add texture without increasing costs. These simple designs work well for winter centerpieces for a wedding on a budget.

What flowers are good for a winter wedding?

Flowers like amaryllis, ranunculus, anemones, and roses work beautifully in winter weddings. Evergreen accents add fullness and a seasonal touch to arrangements. These choices are ideal for winter wedding flower arrangements that feel fresh and elegant.

What is the best color combination for winter?

White and silver create a classic winter look that feels clean and elegant. Jewel tones like emerald and navy paired with gold add richness and warmth. Neutral combinations with green and ivory work well for cozy, rustic winter decor wedding styles.

  •  

How to Make the Perfect DIY Hair Bow: A Step-by-Step Guide

Hair bows may look simple, but many DIY attempts end up uneven, flimsy, or falling apart after just a few wears. You might spend time and ribbon trying to create a bow for hair, only to struggle with shaping, symmetry, or keeping everything securely in place. The real issue usually isn’t a lack of creativity, it’s not knowing the small techniques that make a big difference.

With the right approach, making DIY hair bows becomes surprisingly easy and far more rewarding. Small adjustments can turn an ordinary bow into one that looks polished and professionally made. Once those details click, creating beautiful hair bows feels effortless.

Why Make Your Own Hair Bows?

Making your own hair bows gives you complete creative freedom and control over the final design. You can customize colors, sizes, and ribbon textures such as velvet ribbon for a luxe finish, organza ribbons for light and airy styles, satin ribbon for a smooth elegant look, or grosgrain ribbon for structured everyday bows. This allows you to match specific outfits, themes, or occasions.

Hair Bow Ideas for Different Occasions & Seasons

Occasion / Season

Recommended Colors

Ribbon Types

Style Ideas

Everyday Wear

Neutral, pastels

Grosgrain, satin

Classic pinwheel bows

School & Playdates

Bright colors, patterns

Grosgrain

Simple layered bows

Weddings & Formal Events

White, blush, gold

Satin, organza

Boutique or embellished bows

Holidays (Christmas, CNY, etc.)

Red, green, metallics

Grosgrain, velvet

Festive themed bows

Spring & Summer

Floral, soft pastels

Organza, satin

Lightweight, airy bows

Fall & Winter

Deep tones, plaid

Velvet, grosgrain

Structured layered bows

Babies & Toddlers

Soft neutrals, pinks

Satin, soft grosgrain

Mini or lightweight bows

DIY hair bows are also cost-effective, especially when making multiple pieces for family events, gifting, or craft projects. Purchasing wholesale ribbon allows you to save on costs while keeping a wide variety of colors and styles on hand for different designs. Bow making is also a relaxing and enjoyable activity for both beginners and experienced crafters. Handmade hair bows make thoughtful gifts and are popular, profitable items for small craft businesses.

How to Easily Make a Perfect DIY Hair Bow Using a Ribbon?

1-2 How to Easily Make a Perfect DIY Hair Bow?

1. Prepare the materials you need

Before you begin making your DIY hair bow, gathering the right supplies will help ensure a smooth and enjoyable crafting process. Using quality materials makes the steps easier to follow and allows you to create hair bows that’s look polished and last longer.

  • Ribbon (grosgrain, satin, velvet, or organza)
  • Sharp scissors
  • Hot glue gun or needle and thread
  • Hair clip or hair elastic
  • Lighter or clear nail polish (to seal ribbon ends)
  • Measuring tape or ruler
  • Optional embellishments (rhinestones, pearls, buttons, fabric flowers)

Pro Tip: Buy high-quality crafting materials on trusted and high-rated stores like BBCrafts. Moreover, Grosgrain ribbon is especially beginner-friendly because it holds its shape well and resists slipping. This makes it an excellent choice when learning how to make DIY hair bows that last. 

2. Measure and cut the ribbon

Proper measurement is essential for creating a balanced and proportional hair bow. For a standard-sized bow, cutting 18–22 inches of ribbon provides enough length to form full, even loops. Using a ruler or measuring tape helps ensure consistency, especially if you plan to make multiple bows. 

Clean cuts prevent uneven edges that can affect the final appearance. Sealing the ribbon ends with a lighter or clear nail polish prevents fraying and keeps your bow looking neat over time.

3-4 How to Easily Make a Perfect DIY Hair Bow?

3. Form the bow shape

Laying the ribbon flat helps you visualize the bow before securing it. Bring both ends toward the center and overlap them slightly, making sure each side mirrors the other. Adjusting the loops carefully is key to achieving symmetry, which gives the bow a professional look. 

Take your time during this step, as small adjustments make a big difference. This shaping stage is where your bow for hair begins to take form.

4. Secure the center of the bow

Pinching the center creates folds that give the bow its classic shape and structure. Wrapping thread tightly around the center helps maintain firmness and prevents the bow from loosening. If you’re using hot glue, apply it carefully to avoid visible residue on the ribbon. 

Holding the center in place for a few seconds ensures it sets properly. A strong center is essential for durability, especially when learning how to make hair bows that will be worn often.

5-6 How to Easily Make a Perfect DIY Hair Bow?

5. Create the bow center wrap

The center wrap hides thread or glue and gives the bow a clean, finished look. A small strip of ribbon, about 3–4 inches long, works perfectly for this step. Wrapping it snugly around the center adds structure and visual appeal. Securing it at the back keeps the front smooth and polished. This detail may seem small, but it greatly enhances the overall quality of DIY hair bows.

6. Attach the hair clip or elastic

Attaching the backing turns your bow into a functional accessory. Apply hot glue evenly to the back of the bow to ensure a secure hold. Press the hair clip or elastic firmly into place and allow the glue to cool completely. 

This step ensures the bow stays in position during wear. Proper attachment is especially important when creating bows intended for children or daily use.

7 How to Easily Make a Perfect DIY Hair Bow?

7. Adjust and do finishing touches

Final adjustments bring your bow to life and enhance its overall appearance. Fluffing the loops adds volume and helps correct minor asymmetry. Trimming uneven edges creates a cleaner, more professional finish. Adding embellishments like pearls or rhinestones elevates a simple design into something eye-catching. These finishing touches allow you to personalize each bow for hair uniquely.

Tips for Making Professional-Looking Hair Bows

Measure for Consistency

Consistent measurements are essential for creating balanced and symmetrical hair bows. Taking the time to measure each ribbon piece ensures both sides look even and polished. This is especially important when making multiple bows.

Choose High-Quality Ribbon

Using quality ribbon helps your bow for hair hold its shape and last longer. Thicker ribbons, such as grosgrain, provide better structure and a more professional finish. High-quality materials also make the crafting process easier.

Apply Hot Glue Carefully

Working slowly with hot glue prevents messy application and visible glue marks. Small, controlled amounts create a cleaner look and stronger hold. Allow the glue to set fully before moving to the next step.

Focus on Symmetry

Symmetry plays a big role in how professional a hair bow looks. Adjust the loops and tails until both sides mirror each other. Even minor tweaks can greatly improve the overall appearance.

Practice Layering Techniques

Layering ribbons adds depth and dimension to your DIY hair bows. Combining different widths, colors, or textures creates more visual interest. With practice, layered bows will look fuller and more refined.

Turn Simple Ribbon into Stunning Hair Bows with BBCrafts

Mastering the art of DIY hair bows is both creative and rewarding, turning simple ribbon into accessories that feel personal and polished. As your skills grow, each bow becomes more refined, balanced, and confident in design. Whether you’re crafting for everyday wear, thoughtful gifts, or a small business, handmade hair bows always stand out. 

Your perfect hair bow starts with the right ribbon you choose today. With quality ribbons and crafting supplies from BBcrafts, experimenting with new textures, colors, and styles becomes effortless. 

DIY Hair Bows Frequently Asked Questions (FAQs)

How to make DIY hair bow without sewing?

You can make a DIY hair bow without sewing by using ribbon, scissors, and hot glue or double-sided tape. Fold the ribbon into loops, secure the center with glue or floral wire, and attach it to a hair clip. This no-sew method is quick, clean, and perfect for beginners.

How to make DIY hair bow for beginners?

Beginners can start with a simple loop-style hair bow using wired or grosgrain ribbon. Measure, fold into loops, and secure the center tightly with thread, wire, or glue. Practice with wider ribbon for easier handling and better shape control.

Can I make a hair bow at home?

Yes, you can easily make a hair bow at home using basic supplies like ribbon, scissors, and clips. No special tools are required, and many styles take less than 10 minutes. DIY hair bows are affordable, customizable, and beginner-friendly.

What type of ribbon is used for hair bows?

Common ribbon types for hair bows include grosgrain, satin, velvet, and wired ribbon. Grosgrain ribbon is popular for its durability, while wired ribbon helps bows hold their shape. The best ribbon depends on the bow style and desired look.

How to tie a 3 loop bow with ribbon?

To tie a 3 loop bow, create three even loops on each side of the ribbon. Pinch the center tightly and secure it with wire or thread. Fluff and adjust the loops to create a full, balanced bow.

Are hair bows in style?

Yes, hair bows are very much in style and trending across casual, formal, and bridal looks. They are popular in fashion, children’s accessories, and DIY crafts. Classic and oversized ribbon hair bows continue to be a timeless accessory.

What are the 4 types of bows?

The four common types of bows are classic loop bows, pinwheel bows, layered bows, and boutique bows. Each style varies in structure, fullness, and ribbon technique. These bow types are widely used in hair accessories, gift wrapping, and décor.

How to tie a hair bow?

Tying a hair bow starts by forming two loops and crossing them like tying shoelaces. Pull one loop through the center knot and tighten gently. Adjust the loops and tails for symmetry and fullness.

  •  

How to Make a Ribbon Garland for Any Event

Finding the right decoration can be frustrating when every store offers the same basic garlands. You’re looking for something personal and colorful, but don’t know where to begin. The idea of creating your own can feel overwhelming, especially when you want it to reflect the unique vibe of your event. 

But with just a few simple steps, making a custom ribbon garland is easier than you think and adds that special touch you’ve been searching for.

What Is a Ribbon Garland and Why Use One?

What Is a Ribbon Garland and Why Use One?

A ribbon garland is a simple string filled with colorful ribbons tied across it, creating a bright and cheerful decoration for any event. It’s one of the easiest ribbon garland DIY projects you can make, and you can customize it with your favorite colors and textures. 

A garland with ribbon instantly adds charm and warmth to any space, whether it’s for a party or everyday decor.

Step-by-Step Guide on How to Make Ribbon Garland

Learning how to make ribbon garland is easier than you might think, and it’s a fun DIY project anyone can enjoy. With just a few basic supplies and simple steps, you can create a beautiful garland that fits your style and event theme.

1. Gather Your Materials

1. Gather Your Materials

Before you start, gather a few simple materials:

  • Ribbons
  • String
  • Twine
  • Yarn/rope
  • Scissors

For a more personalized touch, you can also add optional extras like lace, glitter ribbon, beads, or faux flowers. You can create a beautiful garland with ribbon using things you likely already have at home.

2. Choose Your Ribbon Style

Choose the ribbon garland style that fits your event best. Each style creates a different vibe:

  • Bow Style Garland: Light, elegant, and charming. Neatly tied bows hang softly, giving your space a sweet and delicate look. Best for baby showers, birthdays, cozy home décor, or any event where you want something simple and cute. For this style, consider using satin ribbons for a soft, luxurious feel or grosgrain ribbons for a textured, elegant finish. Both types will tie beautifully and add a classic touch to your decor.
  • Tie & Loop Garland: Full, fluffy, and colorful. This lively style adds volume and instantly makes your space feel festive and fun. Best for parties, weddings, holiday celebrations, or any event that needs a bold, vibrant vibe. For a fuller look, try using wire ribbons or solid ribbons to achieve a more structured and voluminous garland. These ribbons hold their shape well, making them ideal for this bold style.
Choose Your Ribbon Style

3. Pick Your Ribbon Colors

Choosing the right ribbon colors is key to matching your garland with ribbons to your event's theme. Based on the occasion, here are some recommended colors:

Event Theme

Recommended Ribbon Colors

Event Vibe/Use

Birthdays

Bright and fun colors

Adds a lively and festive vibe

Christmas

Red, green, and gold

Perfect for holiday spirit

Weddings

Soft whites and pastel shades

Creates an elegant, romantic atmosphere

School Events

School colors

Showcases school spirit and pride

Select colors that fit the mood of your event and bring your ribbon garland to life!

4. Cut Your Ribbon

Cut strips around 10 to 18 inches long. Using the same length keeps the look neat, while mixed lengths add texture and movement. You’ll need enough strips to cover your entire string, and adding extra ribbon creates a fuller, fluffier ribbon garland. If you’re unsure, cut a few more strips than you think you need so your garland with ribbons looks rich and complete once finished.

Tie the Ribbons to the String

5. Tie the Ribbons to the String

Now that your ribbons are cut and ready, it's time to start attaching them to the string. Follow these simple steps to securely tie your ribbons:

  • Start by using a simple knot that's easy to learn and repeat, even for kids.
  • Place each ribbon around the string, twine, or rope, and tie it securely.
  • Gently pull both ends to tighten the knot and ensure it stays in place.
  • Adjust the knot if needed to keep the ribbon even and centered.
  • Continue tying ribbons along the string until the ribbon garland is full, fluffy, and visually balanced.

Once you've tied all the ribbons, your garland with ribbons will be ready to add color and charm to your space!

6. Keep Going Until It Looks Full

Keep tying ribbons until your ribbon garland looks full, fluffy, and colorful. Slide the ribbons closer together if you want a thicker look, or space them out for something lighter and airy. Step back once in a while to check how it looks from a distance. When it feels balanced and bright, your ribbon garland is ready to hang and enjoy.

Hang Your Ribbon Garland

7. Hang Your Ribbon Garland

Once your garland with ribbons is up, adjust the ribbons so they fall naturally and look balanced. A few small tweaks can make a big difference in showing off the colors and giving your display a polished finish. This simple step is part of how to make garland with ribbon, and it’s an easy way to create a beautiful result every time:

  • Use tape, hooks, or push pins to attach your ribbon garland securely.
  • Adjust the string so it hangs evenly and smoothly.
  • Make sure the garland is positioned where all the colors can show off beautifully.

Common Problems You Will Experience Making a Ribbon Garland

Common Problems You Will Experience Making a Ribbon Garland

Creating the perfect ribbon garland can be tricky, but with a few adjustments, you can easily fix common issues:

Your garland looks empty or thin

If your garland appears flat or sparse, don’t worry. Simply add more ribbons between the gaps to create a fuller look. Mixing in thicker ribbons, textured ribbons, or lace can also add depth and volume. The more layers you add, the fluffier and more festive your garland ribbon ideas will become.

Ribbons keep sliding or moving around

If your ribbons aren’t staying in place, it’s likely that the knots aren’t tight enough. To fix this, try using a double knot for a more secure grip on the string. You can also switch to a rougher base string like twine, which will help hold the ribbons in place better than smooth yarn or plastic strings.

String is showing too much

If the string is visible through the ribbons, there are a few simple fixes:

  • Use wider ribbons like ⅝” grossgrain ribbon to cover more of the string.
  • Add shorter ribbons between the longer ones to hide the string better.
  • Layer additional ribbons for more coverage.
  • Choose a darker or matching string color to blend in with the ribbons and make it less noticeable.

These small adjustments will ensure your ribbon garland looks polished and full, even if it's your first time making one.

Make Your Own Ribbon Garland for Any Event with BBCrafts

Learning how to make ribbon garland is simple, fun, and perfect for all ages. Experiment with new colors, mix styles, and explore different garland ribbon ideas to match every event. With just a few easy steps, you can create a vibrant and personalized decoration for any celebration.

Ready to add a personal touch to your next event? Visit BBCrafts to find everything you need to bring your ribbon garland to life!

Ribbon Garland Frequently Asked Questions (FAQs)

How to make a garland with ribbons?

To make a garland with ribbons, cut ribbon strips and tie them evenly onto a string, twine, or rope. Use simple knots and slide the ribbons close together for a fuller look. Adjust spacing as you go to keep the garland balanced and colorful.

What is the easiest way to make a garland?

The easiest way to make a garland is using pre-cut ribbon strips tied directly onto a single string. This method requires minimal tools and works well for beginners. Keeping ribbon lengths consistent helps the garland look neat with little effort.

How to make a 3 loop ribbon bow?

To make a 3 loop ribbon bow, create three equal loops and pinch them together at the center. Secure the middle tightly with wire or a small piece of ribbon. Fluff and adjust each loop so the bow looks full and even.

How to make simple ribbon leis?

Simple ribbon leis are made by cutting ribbon strips and tying them onto a circular string base. Space the ribbons closely to create a full, layered look. Finish by tying the ends of the string together to form the lei shape.

How to make ribbon hold its shape?

Ribbon holds its shape best when you use wired ribbon or stiffer materials like grosgrain. Lightly shaping the ribbon with your hands helps set its form. For extra hold, gentle heat from a hair dryer can help set curves.

How to make ribbon stay curled?

To keep ribbon curled, wrap it tightly around scissors or a dowel and pull firmly. Spray lightly with hairspray to help the curl last longer. Wired ribbon also stays curled better than soft satin ribbon.

How do you put ribbon garland on a Christmas tree?

Start at the top of the tree and weave the ribbon garland downward in loose loops. Tuck sections slightly into branches to keep it secure and natural-looking. Adjust spacing so the ribbon flows evenly around the tree.

How to make ribbon garland for a mantle?

Measure your mantle first so the ribbon garland fits properly. Tie ribbons closely onto a sturdy string and hang it using hooks or removable adhesive. Let the ribbons drape slightly for a soft, decorative finish.

How to add ribbon to garland?

To add ribbon to garland, tie or loop ribbon strips directly onto an existing garland base. Mix different ribbon widths and textures for added depth. Adjust placement to keep the look balanced and full.

How to make satin ribbon garland?

Satin ribbon garland is made the same way as other ribbon garlands but uses soft satin strips. Cut the ribbon cleanly and tie secure knots so it doesn’t slip. Satin works best when ribbons are placed close together for a smooth, elegant look.

  •  

7 Creative Present Wrapping with Ribbon Ideas for Any Gift

Have you ever wrapped a gift and felt like it still looked plain no matter how hard you tried? It’s frustrating, especially when everyone else somehow manages to create picture-perfect presents that stand out. 

Present wrapping with ribbon is the simple upgrade that gives any gift a polished, memorable finish. Use these creative ribbon ideas for gift wrapping to make each present look thoughtful and well-crafted. And there’s a ribbon trick waiting that most people don’t even know exists.

What are the Best Types of Ribbons for Gift Wrapping?

The right ribbon can change the whole look of your gift, making it feel more thoughtful and polished. These gift wrapping ideas ribbon options help you match your style to any celebration. Here’s a quick guide to the most popular ribbon types and when to use them:

  Ribbon Type Description Best Occasions
Satin Ribbon Smooth and shiny; adds a classic, elegant finish. Birthdays, anniversaries, Valentine’s Day, formal events
Grosgrain Ribbon Ribbed texture that offers structure and durability. Birthdays, corporate gifts, children’s gifts
Organza Ribbon Sheer and airy with a soft, delicate look. Weddings, baby showers, holidays
Burlap Ribbon Rustic and natural with an earthy texture. Farmhouse-themed gifts, outdoor events, rustic weddings
Wired-Edge Ribbon Easily holds its shape for full, sculpted bows. Christmas, large presents, decorative holiday gifts
Printed Ribbon Fun patterns, themes, or messages for extra personality. Birthdays, themed parties, holidays, personalized gifts

These ribbon options make it easy to match your gift wrapping style to any celebration, ensuring your presents look thoughtful and well-crafted.

7 Creative Present Wrapping Ideas with Ribbon

Creative Present Wrapping Ideas with Ribbon Classic Bow and layered ribbon style

1. Classic Bow

A classic bow is one of the simplest ways to do present wrapping with ribbon, yet it always looks polished. It works well with any wrapping paper and creates a clean, timeless finish. You can use satin, grosgrain, or organza to match the look you want. This style is perfect for birthdays, holidays, and everyday gifts. It also works well for people searching for wrapping gifts with ribbon ideas.

2. Layered Ribbon Style

Layering ribbons is an easy way to make your present wrapping with ribbon feel more detailed and colorful. Just combine two or three ribbons with different textures or widths. This instantly adds dimension to plain wrapping paper. It’s a great technique when you want your gift to look more creative and full and fits well with present wrapping ribbon ideas for bold designs.

Creative Present Wrapping Ideas with Ribbon Crisscross Ribbon Wrap  and Ribbon Garland Wrap

3. Crisscross Ribbon Wrap

The crisscross wrap gives your gift a modern, structured look. This approach to present wrapping with ribbon works especially well for square or rectangular boxes. The overlapping lines add visual interest without much effort. It’s a stylish choice for formal events or minimalist gift designs. This is also one of the most popular ribbon ideas for gift wrapping for clean, modern styles.

4. Ribbon Garland Wrap

Wrapping the ribbon around the gift several times creates a decorative garland effect. This multi-wrap method adds texture and gives your present wrapping with ribbon a handcrafted feel. It works beautifully with satin or organza ribbons. Use it when you want a fuller, more detailed finish without adding accessories. It’s a great option if you're exploring wrapping gifts with ribbon in a more textured way.

Creative Present Wrapping Ideas with Ribbon Ribbon Rosettes or Flowers and Minimalist Single-Strip Ribbon

5. Ribbon Rosettes or Flowers

Creating rosettes or flowers adds a soft, elegant touch to your gift. This handmade style makes your present wrapping with ribbon look thoughtful and artistic. Wired-edge ribbons work best because they hold their shape. It's perfect for weddings, anniversaries, and feminine-themed gifts. This style stands out among gift ribbon wrapping techniques because of its decorative detail.

6. Minimalist Single-Strip Ribbon

A single ribbon strip creates a clean and modern look. This simple approach keeps your present wrapping with ribbon neat, stylish, and easy to achieve. It’s ideal for corporate gifts or minimal-themed celebrations. Choose solid-color ribbons for the best finish.

7 Creative Present Wrapping Ideas with Ribbon Gift Tags and Add-Ons

7. Gift Tags and Add-Ons

Ribbon pairs perfectly with tags, charms, or small decorations. Adding these accents gives your present wrapping with ribbon a personalized touch. You can attach mini ornaments, dried flowers, or handwritten notes. This idea makes every gift feel thoughtful and unique..

Expert Crafting Tips for Better Ribbon Wrapping

Expert Crafting Tips for Better Ribbon Wrapping

Small adjustments can make your present wrapping with ribbon look cleaner, sharper, and more professional. These simple tips help you create smooth lines, fuller bows, and polished finishes every time.

  • Match ribbon texture to your wrapping paper for a balanced look.
  • Choose colors that fit the occasion or the style you want.
  • Fluff wired ribbons to create fuller, well-shaped bows.
  • Pull ribbon tightly for a neat finish that stays in place.
  • Store leftover ribbons neatly by rolling them and securing them with clips or pins.

With these easy techniques, your ribbon-wrapped gifts will consistently look thoughtful and beautifully put together.

Create Stunning Ribbon-Wrapped Gifts Today

Creative present wrapping with ribbon is a simple way to make any gift feel thoughtful and memorable. With the right ribbon styles, easy techniques, and decorative add-ons, your gifts can look polished and special for any occasion. 

If you're ready to put these ideas into action, choose high-quality ribbons and craft materials that highlight your creativity. Explore BBCrafts for premium ribbons and wrapping supplies that help you create gifts worth remembering.

Present Wrapping With Ribbon Frequently Asked Questions

How to wrap a present with ribbon?

Place the ribbon under the box, cross it neatly on top, then flip and cross it again underneath. Tie a centered bow and adjust the loops so it looks balanced and secure.

How to wrap a gift in a unique way?

Choose fabric, kraft paper, or layered textures instead of standard wrapping paper. Add a personal touch like dried flowers, twine, or a handwritten tag to elevate the look.

How to curl ribbon for gift wrapping?

Hold the ribbon firmly against scissors and pull it in one smooth motion. Repeat slowly for tighter curls and more volume.

How to wrap a string around a gift?

Wrap the string evenly around the box, keeping tension consistent so it stays clean. Cross it once on top and finish with a simple knot or bow.

What is the Japanese method of gift wrapping?

It is called furoshiki and uses cloth folded and tied around the gift. This method looks refined and supports reusable, low-waste wrapping.

What are common gift wrapping mistakes?

Using too much paper leads to bulky corners and uneven folds. Poor alignment and weak tape make even good materials look messy.

What is the first step in gift wrapping?

Measure the paper against the gift before cutting. This helps create clean seams and a polished final result.

  •  

A Complete Guide on How Satin Is Made

Satin’s glossy shine results from a detailed and thoughtful process. The choice of materials and techniques used play a significant role in shaping the fabric’s luxurious appearance and texture. 

Over centuries, satin has been perfected into the stunning fabric we know today. You might know it’s elegant, but what really goes into creating satin? 

It all starts with the weaving and finishing techniques that give satin its signature sheen.

What Is Satin Ribbon?

Satin ribbon is a fabric ribbon characterized by its glossy, smooth surface on one side and a matte finish on the other. Known for its elegance, satin ribbon comes in various sizes, colors, and finishes, making it a popular choice for everything from bridal bouquets to decorative bows. Its distinctive sheen is the result of specialized weaving and finishing techniques, which set it apart from other ribbons like grosgrain or velvet.

A Brief History of Satin Ribbon

A Brief History of Satin Ribbon

Satin ribbon has its roots in ancient China, where silk weaving techniques were developed over 2,000 years ago. These techniques spread along the Silk Road, reaching Europe during the Middle Ages. The name "satin," derived from the Arabic word "zaitun," which referred to the Chinese port city of Quanzhou, became synonymous with luxury in European courts due to its softness and shine.

In the 19th century, advancements in textile machinery and industrialization made satin ribbons more accessible. While silk remained the preferred material for many years, the invention of synthetic fibers in the 20th century revolutionized the market. Satin ribbons made from synthetic fibers became dominant, offering the richness of traditional satin at a more affordable price.

The Materials Behind Satin Ribbon Quality

The Materials Behind Satin Ribbon Quality

The quality of satin ribbon starts with careful material selection. Satin ribbons are typically made from one of the following materials:

  • Silk Known for its luxurious feel, silk gives satin ribbons a delicate, lightweight texture and a highly reflective shine.
  • Polyester A more affordable yet durable option, polyester offers a similar glossy appearance at a lower price point.
  • Nylon -  Often used for industrial or floral applications, nylon creates strong, sleek ribbons perfect for high-tension decorations.

At this stage, attention to detail plays a major role, as the choice of material directly influences the ribbon's texture, durability, and shine.

Different Types of Satin Ribbons

Different Types of Satin Ribbons

Satin ribbons come in a variety of sizes and finishes, offering something for every project. From delicate single-faced ribbons to sturdy double-faced options, green satin ribbon, satin red ribbon, and satin ribbon roll are available in a wide range of widths and patterns to suit your needs. 

Common European sizes include 3mm, 6mm, 10mm, 15mm, 25mm, 35mm, 38mm, 50mm, and 70mm, with slight variations found in ribbons from the Far East and America, such as 12mm instead of 10mm, 22mm instead of 25mm, and 100mm instead of 70mm.

The texture and stretch of satin ribbons also vary, giving you flexibility to choose the perfect option for your design. Additionally, satin ribbons come in an extensive range of colors, including satin ribbon roses and other vibrant shades, with many options available at BBcrafts to match any project or event.

With so many options to choose from, satin ribbon remains a go-to material for crafters, event planners, and designers.

Benefits of Satin Fabric Ribbons

Satin fabric ribbons are highly adaptable and widely used across various applications, such as hair accessories, gift bows, clothing accents, crafts, event decorations, and embellishments for different items.

Because of their wide range of uses, satin ribbons are available in many variations:

  • Colors Satin ribbons come in an extensive range of colors, including standard shades. We stock 100 colors, covering the entire color spectrum. Additionally, at Manubens, we offer custom color production with minimum quantities, thanks to our expert dyeing department and color specialists.
  • Widths Satin ribbons can be customized to fit any need, ranging from a narrow 3mm to a broad 100mm. Available standard widths include 3, 6, 8, 10, 12, 16, 20, 25, 38, 48, 68, 84, and 100mm.
  • Presentations – Satin ribbons come in various formats based on the quantity required. For example, clothing manufacturers can choose industrial rolls of 100 meters, while haberdasheries often prefer smaller quantities, such as 25-meter glass spools.

This wide selection of colors, widths, and formats makes satin fabric ribbons an ideal choice for countless uses.

DIY Fashion Accessories with Satin Ribbon

Satin ribbon is a great way to make your own fashion accessories that show off your personal style. It’s easy to use and adds a special touch to any DIY project.

Creating Stylish Headbands and Chic Satin Ribbon Belts

Creating Stylish Headbands

Satin ribbon is an ideal material for crafting personalized headbands. With its smooth texture and vibrant colors, such as green satin ribbon or satin red ribbon, you can create one-of-a-kind designs that match your personal style. Here are a few ideas:

  • Attach a satin ribbon roll to a plain headband for a splash of color.
  • Weave several ribbons together, like satin ribbon roses, for a chic braided look.
  • Add embellishments like flowers or beads to enhance the design.

Experiment with different widths and textures to customize your headband for any outfit, turning it into a statement piece!

Chic Satin Ribbon Belts

Add a touch of flair to your wardrobe with a satin ribbon belt. These belts are lightweight and versatile, making it easy to accentuate your waist. Here’s how to style them:

  • Wrap a wide satin ribbon roll around your waist over a dress to create a defined silhouette.
    Tie a bow at the back or side for a more elegant finish.
  • Mix and match colors like green satin ribbon or satin red ribbon to complement various outfits and occasions.

Satin ribbon belts are not only functional but also a great way to express your personal style while enhancing your look.

Unique Jewelry Creations

Create unique jewelry pieces with satin ribbon roll that highlight your creativity. Here are some ideas:

  • Create a layered ribbon necklace by tying different lengths of satin red ribbon together.
  • Design matching earrings using small loops or knots of green satin ribbon.
  • Wrap bracelet bases with satin ribbon roll or incorporate it into hairpins for added charm.

Incorporating satin ribbon roses into your jewelry designs adds a soft, dimensional touch, ensuring each piece stands out and reflects your personal fashion sense.

Satin Ribbon – Let Your Creativity Shine

Satin ribbon is more than just a decorative accessory; it’s a tool that lets your imagination soar. If you’re crafting headbands with green satin ribbon, adding flair with a satin ribbon belt, or designing unique jewelry pieces, satin ribbon has the power to transform your creations. It’s a material that adapts to your ideas, making it perfect for everything from fashion accessories to home décor.

Don’t settle for ordinary—take satin ribbon and make it your own. With endless colors, sizes, and finishes to choose from at BBcrafts, your only limit is your creativity. 

So, why wait? Grab a satin ribbon roll, add some satin ribbon roses, and watch your next DIY project come to life. The world is your canvas, and BBcrafts satin ribbon is your perfect material. Why not create something unforgettable today? The possibilities are endless!

Key Takeaways

Satin’s Unique Shine

Satin’s signature glossy finish is the result of specialized weaving and finishing techniques that set it apart from other fabrics like grosgrain and velvet. The material's texture, whether it’s made from silk, polyester, or nylon, plays a key role in its luxurious appearance.

Satin Ribbon Varieties

Satin ribbons come in a wide range of sizes, colors, and finishes, including options like green satin ribbon and satin red ribbon. These ribbons can be customized to fit any project, from headbands to jewelry, making satin a top choice for crafters and designers alike.

Endless Creative Possibilities

Satin ribbons aren’t just for traditional uses—they’re perfect for DIY fashion accessories like belts, headbands, and unique jewelry pieces. With satin ribbon roll and satin ribbon roses available in various colors and widths, the potential for personalized, stylish creations is limitless!

  •  

What Is Wired Ribbon?

Wired ribbon is a type of decorative ribbon with thin, flexible wire stitched along the edges. This wire helps the ribbon hold its shape, making it ideal for bows, wreaths, floral arrangements, and other structured decorations.

Limited selection in local stores—colors and textures often don’t match the event theme. This common issue drives many decorators and planners to search beyond local shelves for better options. Globally, the art and craft materials market was valued at $24.19 billion, with expectations to reach $41.71 billion by 2034.

So why let limited stock hold back your best designs?

Why Use Wired Ribbon?

Why Use Wired Ribbon?

Wired ribbon holds its shape in a way regular ribbon just can’t. With thin wire stitched into the edges, it lets you twist, loop, or bend freely—and it stays in place. That’s why wire ribbon is often preferred for both quick crafts and detailed designs. If you’re wondering how to use wired ribbon, the answer is simple: shape it, place it, and enjoy a clean, polished result.

From holiday wreaths to wedding décor, ribbons with wire make styling easy. Many decorators rely on wholesale wired ribbon for wreaths because it offers the structure needed to build bold, lasting designs at scale. If you're wrapping chairs or dressing arches, wired ribbon, the range offers endless creative options in every style and color.

Features of Wired Ribbon

  • Holds Its Shape – The built-in wire lets you curl, twist, and style with control—and it stays exactly where you set it.
  • Wide Design Options – Available in many colors, prints, and materials, wired ribbon rolls work for gift wrapping, bows, floral displays, and more.
  • Built to Last Its firm edges and strong fabric help your decorations look clean and stay in shape, even after repeated use.

How Is Wired Ribbon Made?

How Is Wired Ribbon Made?

Wired ribbon typically consists of fabric—like satin, organza, linen, or burlap—with a thin metal wire stitched into the edges. The wire is usually made from stainless steel or copper and is flexible enough to shape but strong enough to hold.

The wire is hidden within a hem, so it's not visible but provides that signature stiffness when shaping the ribbon into bows or swirls.

When to Use Wired Ribbon

Wired ribbon works best in projects that need shape, structure, and a little extra polish. Its flexible edges make it a go-to for decorations that need to hold their form and look clean from every angle. Below are some great ways to use it:

Shaping the Perfect Bow and  Designing Wreaths and Garlands

1. Shaping the Perfect Bow

Wired ribbon is a favorite for bow-making. It lets you shape neat loops and curves that actually stay in place. Once you've styled the bow, it holds that full, finished look—great for gift wrapping, crafts, or accent pieces.

2. Designing Wreaths and Garlands

When you're working on a wreath, every detail counts. Wired ribbon makes it easy to create bold loops, clean folds, or layered accents that don’t fall flat. It’s a solid choice for both holiday pieces and everyday décor.

Styling Floral Arrangements and  Decorating for Parties and Events

3. Styling Floral Arrangements

Adding wired ribbon to flower arrangements gives you more control over the overall appearance. You can create soft curves or dramatic twists that highlight your bouquet without overpowering it.

4. Decorating for Parties and Events

For weddings, birthdays, or seasonal parties, wired ribbon brings a polished look. Use it for table runners, centerpieces, or even backdrop features that need a little structure to stand out.

5. Upgrading DIY Projects

Wired ribbon is great for home décor and custom crafts. Try it on wall hangings, wrapped gifts, or handmade decorations where shape and finish matter. Its flexibility lets you try new styles without the ribbon falling flat.

If you want to learn which crafts and projectss wired ribbons are best to use, read our blog "7 Best Wired Ribbon Craft Ideas for Every Occasion".

Wired vs Non-Wired Ribbon

Not sure which type of ribbon fits your project? Here's a quick comparison to help you decide. While both wired and non-wired ribbons have their place in crafting and décor, each serves a different purpose depending on the look and structure you want to achieve.

Features

Wired Ribbon

Non-Wired Ribbon

Shape Retention

Holds shape when bent or twisted

Soft and drapey, doesn’t hold shape on its own

Best Use

Ideal for bows, wreaths, and structured floral designs

Great for tying, wrapping, and adding soft accents

Difficulty to Use

Easy to shape and style, but a bit stiff for tight knots

Simple to tie and manipulate, but lacks structure

Visual Impact

Creates a bold, clean, and polished finish

Offers a more relaxed, flowing, and casual look

Tips for Using Wired Ribbon

Tips for Using Wired Ribbon

Working with wired ribbon gets easier with a few simple tricks. Keep these tips in mind to shape, style, and finish your designs with confidence:

Start with Easy Projects

If you're new to wired ribbon, begin with simple loops or basic bows. Practicing the basics first helps build the skill you’ll need for more detailed designs later on.

Combine Different Materials

Wired ribbon pairs beautifully with soft fabrics, flowers, or greenery. Mixing textures adds depth to your project and helps your design feel layered and complete.

Choose the Right Tools

Have your scissors ready, and grab a pair of wire cutters for trimming edges cleanly. Floral wire or tape also comes in handy to hold everything in place once you're happy with the shape.

Plan Before You Shape

A quick plan goes a long way. Thinking through the look you want before you begin helps you shape the ribbon more precisely and saves time in the process.

Ribbon That Holds More Than Shape

Wired ribbon brings structure, style, and results that last. At BBCrafts, our wired ribbon makes it easy to shape bows, wreaths, and centerpieces that stay in place—no drooping, no fuss. It’s the tool decorators rely on when appearance matters and time is tight.

Looking for more options? BBCrafts offers wholesale ribbon in all styles, including elegant satin ribbon for clean finishes and durable grosgrain ribbon for detailed craft work. With bulk pricing and a wide range of colors, you’ll always find what fits your project.

Why work with supplies that fall short? BBCrafts gives you quality ribbon that holds up and helps your designs shine. From everyday crafts to major events, we make it simple to get what you need—fast, affordable, and ready to go. Shop wired ribbon, satin, grosgrain, and more at BBCrafts—your go-to source for ribbons that deliver.

FAQs

What is wire ribbon used for?

Wire ribbon is used for making bows, wreaths, floral designs, and decorative crafts where shape and structure are important.

How to use wired ribbon for wreaths?

Cut the wired ribbon into strips, loop or twist it, and secure it onto the wreath frame using floral wire or pipe cleaners for added hold.

Where can I buy wholesale wired ribbon for wreaths?

You can buy wholesale wired ribbon for wreaths from craft supply stores and online retailers like BBCrafts, which offer bulk pricing and various styles.

What are wired ribbon rolls and how are they different?

Wired ribbon rolls are spools of ribbon with flexible wire along the edges, allowing the ribbon to hold its shape. They’re ideal for structured designs like bows and wreaths.

  •  
❌